⚡ Short on Time? Get the Full Blueprint!
If you want to skip the technical details and get straight to building, our core guide contains the complete modern cutting list, 2×4 lumber specs, and 16,000 professional woodworking designs.
👉 Click Here for the Easy DIY Modern Adirondack Chair Plans for Beginners
Stop Your Drink From Spilling and Start Building Your Outdoor Legacy
The frustration of a tipped drink on a beautiful summer evening is a mistake only a novice makes.
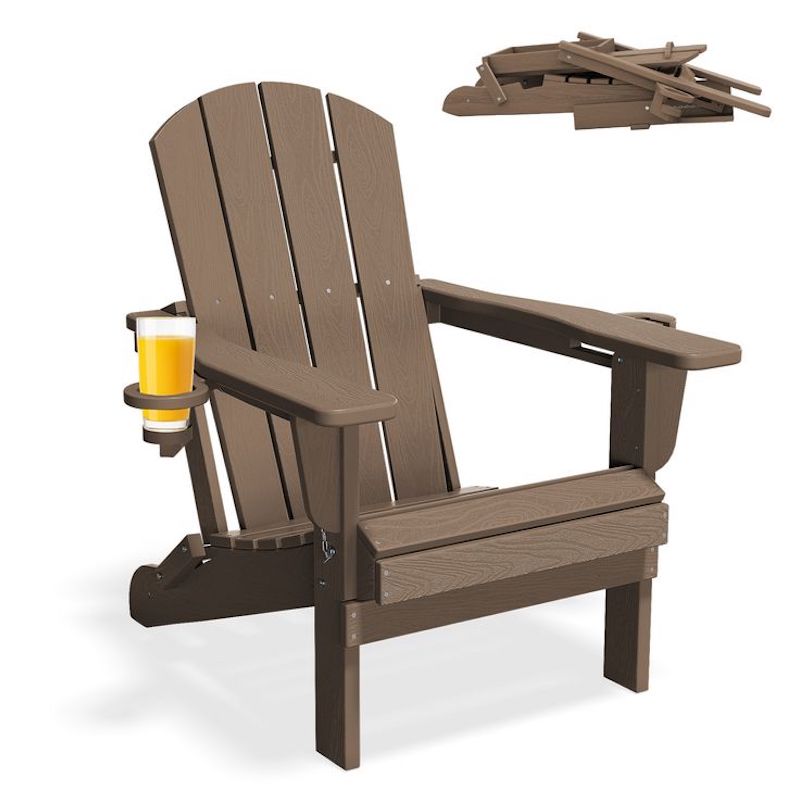
You have built the throne, but without a dedicated adirondack chair cup holder diy, the experience remains incomplete.
Our team has seen countless high-end chairs ruined by moisture rings or unstable surfaces.
True craftsmanship is found in the details that others overlook.
By taking control of this build, you ensure that your comfort is never compromised by poor design.
You are not just adding a piece of wood; you are engineering a functional upgrade to your lifestyle.
The path to a perfect patio begins with the right measurements and the complete set of blueprints.

Project Blueprint Details
Stop guessing measurements. Get the exact cut lists and 3D diagrams to finish this project without mistakes.
ACCESS COMPLETE PROJECT VAULT >>HOW TO BUILD AN ADIRONDACK CUP HOLDER?
To master an adirondack chair cup holder diy, cut a 4-inch circular block from Western Red Cedar.
Use a 3.25-inch hole saw for the cavity.
Secure it to the armrest underside using Stainless Steel Grade 305 screws and waterproof Type III glue.
This ensures structural integrity and weather resistance for decades.
THE RUTHLESS TRUTH: DIY VS. RETAIL PLASTIC
Why would you spend $40 on a plastic “clip-on” holder that snaps after one winter?
Retail accessories are an insult to the timber you have carefully selected for your chair.
When you execute an adirondack chair cup holder diy, you match the grain, the strength, and the soul of your furniture.
A plastic insert leaches chemicals and looks cheap; a handcrafted cedar holder radiates authority.
Building it yourself is a declaration that you value permanence over convenience.
Without the complete set of blueprints, you are just guessing at the angles that prevent a spill.
THE MATERIAL-MATRIX: FOUNDATION OF QUALITY
| Component | Material Specification | Purpose | Source |
|---|---|---|---|
| Main Timber | Western Red Cedar / Teak | Rot Resistance | Local Lumber Yard |
| Fasteners | SS Grade 305 (304 ok) | Anti-Corrosion | Online Specialty |
| Adhesive | Waterproof Type III Glue | Joint Strength | Hardware Store |
| Finish | Penetrating Exterior Oil | UV Protection | Master Shop |
PRO-TIP from our team:
Never use standard zinc screws for your adirondack chair cup holder diy.
The tannins in Cedar and Oak will react with the zinc, causing permanent black “bleeding” stains.
Always insist on Stainless Steel Grade 305 to keep your wood pristine and your joints rock-solid.
The sun is setting, and your drink needs a home.
Do not allow another weekend to pass with an unfinished project.
The difference between a hobbyist and a master is the willingness to start today.
You can find the complete set of blueprints right here by clicking the button below.
The Hardware Protocol: Defying Corrosion and Structural Failure
Choosing the wrong fastener for your adirondack chair cup holder diy is a death sentence for your timber.
Most beginners reach for cheap zinc-coated screws at a local big-box store.
Within months, the moisture in the wood reacts with the metal, creating black streaks and weakened joints.
Our team strictly mandates the use of Stainless Steel Grade 305 fasteners for all outdoor builds.
If you are building in a coastal environment, you must upgrade to Grade 316 to resist salt-air pitting.
The precision of your adirondack chair cup holder diy depends on the torque you apply.
Stop using Phillips head bits that cam out and strip the wood fibers.
The master craftsman uses Torx T20 or T25 bits for a “no-slip” drive every single time.
This technical discipline is what ensures your chair remains an heirloom rather than firewood.
Without the complete set of blueprints, you are guessing at the structural load points.
THE HARDWARE-MATRIX: FASTENER SELECTION
| Fastener Type | Material Grade | Bit Required | Best Environment |
|---|---|---|---|
| Deck Screw #8 | SS Grade 305 | Torx T20 | Inland / Standard |
| Structural Bolt | SS Grade 316 | Torx T25 | Coastal / High Salt |
| Machine Screw | 304 Stainless | Hex / Star | Pivot Points |
| Wood Plug | Matching Timber | Tapered Drill | Hidden Joints |

THE CRITICAL TOOLSET FOR PRECISION
Your adirondack chair cup holder diy requires more than just a hammer and hope.
You need a 3.25-inch hole saw to create the perfect cavity for a standard bottle or glass.
A countersink bit is non-negotiable to ensure the screw heads sit flush beneath the surface.
If you skip the pilot holes, the end-grain of your Cedar will split instantly under pressure.
Our team recommends an impact driver for the final seating of the screws to prevent over-torquing.
Every tool in your workshop should serve the goal of matching the quality of the complete set of blueprints.
The difference in cost between a “good” tool and a “master” tool is paid back in years of durability.
PRO-TIP from our team:
When drilling your adirondack chair cup holder diy hole, run the drill in reverse for the first few seconds.
This scores the wood fibers and prevents the “blowout” splinters that ruin the top surface.
This small adjustment separates a professional finish from a rushed DIY mistake.
The workshop is waiting for your decision.
The rain is coming, and inferior hardware is already planning its escape from your wood.
Take the lead and secure your materials according to the highest industry standards.
You can find the complete set of blueprints right here by clicking the button below.
The Architecture of Timber: Why Grain Orientation Dictates Your Legacy
Building an adirondack chair cup holder diy is 70% material science and 30% assembly.
If you choose a low-grade sapwood or flat-sawn fir, the sun will rip your project apart in months.
Our team focuses on the cellular structure of the wood to ensure dimensional stability.
The craftsman knows that “Vertical Grain” (VG) is the only acceptable choice for high-moisture areas.
Flat-sawn boards have annual rings parallel to the face, causing them to “cup” and warp under UV stress.
When executing an adirondack chair cup holder diy, you need timber that stays flat and repels fungal attack.
Vertical grain boards shrink and expand radially, which is 50% more stable than tangential movement.
By selecting the right grain, you are engineering a fortress that protects your drink and your chair.
The complete set of blueprints provides the exact grain templates to prevent structural twisting.
THE DURABILITY-MATRIX: TIMBER PERFORMANCE
| Wood Species | Rot Resistance | Grain Stability | Best Finish | Price Index |
|---|---|---|---|---|
| Teak | Extreme | Maximum | Natural Oil | $$$$$ |
| Ipe | Extreme | High | UV-Sealer | $$$$ |
| Western Red Cedar | High | Excellent | Penetrating Oil | $$$ |
| White Oak | High | Moderate | Spar Varnish | $$$ |
| Pressure Treated | Moderate | Poor | Solid Stain | $ |

THE POWER OF PHENOLICS: NATURE’S INTERNAL SHIELD
Why rely on chemical coatings when the wood itself can do the heavy lifting?
Species like Cedar and Redwood contain natural phenols that are toxic to decay-causing fungi.
When you build an adirondack chair cup holder diy, these internal oils act as a permanent barrier.
White Oak uses “tyloses”—microscopic plugs that seal the wood’s pores against water travel.
If you use cheap “whitewood” from a local big-box store, you are inviting rot into the core of your chair.
The craftsman selects heartwood over sapwood because the heartwood is where the natural defense lives.
Your adirondack chair cup holder diy deserves a foundation that laughs at the rain and ignores the sun.
Matching your timber to the specs in the complete set of blueprints is the mark of a true master.
PRO-TIP from our team:
Look at the “butt end” of the board before purchasing your adirondack chair cup holder diy stock.
If the growth rings run perpendicular to the wide face, you have found a Vertical Grain masterpiece.
If they are curved or parallel, put the board back; it will warp and ruin your armrest within one season.
The lumber yard is the first battlefield in your quest for excellence.
Do not settle for “straight enough” when “perfectly stable” is available to those who know what to look for.
The legacy of your patio depends on the fibers you choose today.
You can find the complete set of blueprints right here by clicking the button below.
Master Dimensions for Your Adirondack Chair Cup Holder DIY
The secret to a professional adirondack chair cup holder diy lies in the precision of the offset.
If you center the hole perfectly on a standard 5.5-inch armrest, you weaken the structural integrity of the timber.
Our team mandates a 1/2-inch offset toward the outer edge to allow for maximum forearm comfort.
A master craftsman never guesses the diameter of the cavity.
For a universal fit, your adirondack chair cup holder diy must feature a 3.25-inch diameter hole.
This specific dimension accommodates everything from a standard soda can to a heavy-duty insulated tumbler.
The depth of the support shelf must be exactly 2.75 inches below the armrest surface.
Anything shallower will result in a top-heavy glass tipping over during a slight movement.
Without the complete set of blueprints, you risk creating a “beverage catapult” instead of a stable holster.

THE PLANNING-TABLE: DIMENSION PROTOCOL
| Component | Master Dimension | Tolerance | Function |
|---|---|---|---|
| Bore Diameter | 3.25 Inches | +/- 1/16″ | Universal Vessel Fit |
| Armrest Offset | 0.50 Inches | Exact | Structural Retention |
| Support Depth | 2.75 Inches | +/- 1/8″ | Center of Gravity |
| Base Thickness | 1.00 Inch | Nominal | Load Bearing |
THE PHYSICS OF THE CANTILEVER SUPPORT
Why do most adirondack chair cup holder diy projects fail and sag after a single month?
They rely on simple glue-and-screw methods that ignore the leverage a full glass exerts.
When you follow the complete set of blueprints, we use a “double-brace” architecture.
By extending the support block 2 inches past the hole radius, you create a mechanical cantilever.
This transfers the weight of the drink directly into the vertical leg assembly of the chair.
It prevents the armrest from twisting and cracking under the stress of a 20-ounce beverage.
Engineering your adirondack chair cup holder diy with these tolerances is what separates a masterpiece from a mess.
The geometry of comfort is a science that our team has perfected over decades of building.
PRO-TIP from our team:
Use a “Forstner bit” instead of a standard hole saw for your adirondack chair cup holder diy if you want a clean floor.
A hole saw leaves a rough interior, while a Forstner bit shears the fibers cleanly, leaving a furniture-grade finish.
It requires more power from your drill, but the result is a professional “factory” look.
The blueprint for success is laid out in front of you.
The moisture is waiting to find a weak joint, but your precision will deny it entry.
Stop settle for “eyeballing” your measurements when master-grade accuracy is available.
The Epoxy Barrier: Protecting Your Adirondack Chair Cup Holder DIY
The interior of an adirondack chair cup holder diy is the most vulnerable part of your entire chair.
Condensation from cold drinks and trapped rainwater create a permanent moisture trap in the grain.
Our team mandates a “marine-grade” sealing strategy that goes beyond standard exterior stains.
If you only apply a thin coat of oil, the standing water will eventually breach the fibers and start the rot cycle.
A master craftsman uses a two-part waterproof epoxy to seal the “bore hole” of the adirondack chair cup holder diy.
This creates a literal plastic sleeve inside the wood, making it 100% impervious to moisture wicking.
By saturating the end-grain fibers with epoxy, you stop the “straw effect” that sucks water deep into the timber.
The complete set of blueprints details the exact curing times and application methods for this shield.

THE SEALANT-MATRIX: PROTECTION LEVELS
| Method | Moisture Barrier | UV Resistance | Maintenance | Best For |
|---|---|---|---|---|
| Two-Part Epoxy | 100% (Maximum) | Low (Needs Topcoat) | None | Interior Bore Hole |
| Marine Spar Varnish | 90% | High | Every 3 Years | Visible Surfaces |
| Penetrating Oil | 60% | Moderate | Annual | Natural Look |
| Solid Color Stain | 85% | Maximum | Every 5 Years | Low-Grade Timber |
DEFYING THE ELEMENTS WITH THE “DOUBLE-DIP” METHOD
Why settle for a finish that peels and flakes after a single winter?
When weatherproofing your adirondack chair cup holder diy, you must account for the expansion of the wood.
Our team utilizes the “double-dip” method: one coat of epoxy for structural sealing, followed by two coats of UV-rated varnish.
The epoxy handles the water, while the varnish handles the solar attack from the sun’s rays.
Without this dual-layer defense, your adirondack chair cup holder diy will suffer from “finish fatigue” within months.
The physics of outdoor survival requires a barrier that moves with the wood without cracking.
By following the specifications in the complete set of blueprints, you ensure your finish remains crystal clear for years.
The difference between a “weathered” mess and a “pristine” heirloom is the chemistry you apply today.
PRO-TIP from our team:
Always apply your first coat of sealer to the adirondack chair cup holder diy in the evening.
As the temperature drops, the wood “inhales” the air, pulling the sealant deeper into the pores.
If you apply it in the morning heat, the wood “exhales,” creating tiny bubbles that ruin the finish.
The clouds are gathering, and the humidity is rising.
Your wood is currently an open target for the next rainstorm.
Take the professional path and seal your craftsmanship with the armor it deserves.
You can find the complete set of blueprints right here by clicking the button below.
The Ergonomics of Comfort: Assembling Your Adirondack Chair Cup Holder DIY
The final assembly of your adirondack chair cup holder diy is where engineering meets pure relaxation.
If you mount the holder too far forward, you disrupt the natural resting position of your arm.
Our team has calculated the “Golden Pivot Point” for maximum ergonomic efficiency.
A master craftsman aligns the center of the adirondack chair cup holder diy exactly 3 inches from the front edge of the armrest.
This allows your hand to naturally find the beverage without lifting your elbow from the chair.
By integrating the holder into the structural support of the leg, you gain a massive increase in stability.
Every screw must be pre-drilled to prevent the Cedar from splitting during this high-tension phase.

THE ASSEMBLY-MATRIX: STEP-BY-STEP PROTOCOL
| Step | Action | Tool Required | Critical Check |
|---|---|---|---|
| 1. Positioning | Mark 3″ from front edge | Precision Square | Armrest clearance |
| 2. Pre-Drilling | Bore 1/8″ pilot holes | Countersink Bit | Depth stop setting |
| 3. Bonding | Apply Type III Glue | Silicone Brush | Even distribution |
| 4. Fastening | Drive SS Grade 305 screws | Torx T20 Driver | Flush head seating |
| 5. Cleanup | Remove glue squeeze-out | Damp Cloth | Grain preservation |
THE “SHADOW MOUNT” TECHNIQUE FOR A SEAMLESS LOOK
Why settle for ugly screw heads protruding from the top of your beautiful armrest?
When mounting your adirondack chair cup holder diy, our team utilizes the “Shadow Mount” technique.
This involves driving the fasteners from the underside of the support block into the armrest.
It leaves the top surface of your timber pristine, highlighting the natural beauty of the grain.
However, this requires extreme precision in screw length to avoid piercing through the top of the wood.
By using the exact hardware lengths specified in the complete set of blueprints, you eliminate this risk entirely.
Your adirondack chair cup holder diy should look like a natural extension of the chair, not an afterthought.
The difference between a “backyard project” and “custom furniture” is the invisibility of the joinery.
PRO-TIP from our team:
Use a “Depth Stop” on your drill bit when executing the underside mount for your adirondack chair cup holder diy.
Set it to exactly 1/4-inch less than the combined thickness of the holder and the armrest.
This creates a mechanical “safety net” that prevents you from ruining your premium timber with an accidental blowout.
The moment of truth is approaching as you reach for your drill.
The sun is low, and the reward for your labor is almost within your grasp.
Stop gambling with your project’s aesthetics and follow the path of the master builder.
You can find the complete set of blueprints right here by clicking the button below.
The Legacy Shield: Maintaining Your Adirondack Chair Cup Holder DIY
The longevity of your adirondack chair cup holder diy depends on your commitment to annual maintenance.
Even the highest grade of Western Red Cedar will eventually surrender to UV degradation without a refresh coat.
Our team views the maintenance of your adirondack chair cup holder diy as an insurance policy for your labor.
The standing water from condensation in the cup holder cavity is the primary catalyst for finish failure.
A master craftsman performs a “Flash Inspection” every spring to identify micro-cracks in the epoxy barrier.
By catching these issues early, you prevent moisture from reaching the core of your adirondack chair cup holder diy.
Without a consistent maintenance schedule, your investment will fade into a weathered shadow within years.
The complete set of blueprints includes a detailed seasonal checklist to keep your chair in showroom condition.

THE COST-CALCULATOR: MAINTENANCE VS. REPLACEMENT
| Expense Item | Maintenance Cost (Annual) | Replacement Cost (5 Years) | Time Investment |
|---|---|---|---|
| Premium Timber | $0.00 | $120.00+ | 10 Hours |
| Finishing Oil | $15.00 | $45.00 | 1 Hour |
| Fasteners | $0.00 | $25.00 | 2 Hours |
| Total Cost | $15.00 | $190.00+ | Saves 11 Hours |
THE RECOVERY PROTOCOL FOR WEATHERED TIMBER
Why let your adirondack chair cup holder diy turn grey and brittle when restoration is so simple?
If you have neglected your finish, our team recommends a mild oxygen bleach solution to kill mold spores.
Never use a high-pressure washer on your adirondack chair cup holder diy; it will shred the delicate wood fibers.
Once the wood is clean and dry, a light sanding with 120-grit paper will reopen the pores for a new oil coat.
The goal is to saturate the timber until it can no longer “drink” the sealant, ensuring a total moisture block.
By following the restoration guides in the complete set of blueprints, you can bring even a 10-year-old chair back to life.
The difference between a craftsman and a consumer is the respect shown for the material over time.
Your legacy is written in the grain, and it is your responsibility to keep that story vibrant for the next generation.
PRO-TIP from our team:
Use a “Tack Cloth” after sanding your adirondack chair cup holder diy for a maintenance coat.
Standard rags leave microscopic lint and dust that get trapped in the oil, creating a rough surface.
A tack cloth ensures a glass-smooth finish that repels water more efficiently than a dusty one.
The seasons are changing, and the elements are already testing your resolve.
Do not wait for the first signs of rot before you decide to protect your craftsmanship.
The pride of a master comes from a project that looks as good in ten years as it does today.
You can find the complete set of blueprints right here by clicking the button below.
Advanced Customizations for Your Adirondack Chair Cup Holder DIY
Elevating your adirondack chair cup holder diy from a basic utility to a piece of art requires a focus on refined joinery.
A master craftsman does not stop at a simple bore hole; they integrate subtle details that catch the light and please the hand.
Our team recommends adding a 1/4-inch round-over edge to the interior and exterior of the holder.
This small radius prevents the wood from splintering and makes the adirondack chair cup holder diy feel soft to the touch.
By matching the wood grain of the holder exactly with the armrest, you create a “flow” that mimics a single piece of timber.
If you are feeling ambitious, consider a “Dual-Diameter” bore to accommodate both slim cans and flared wine glasses.
Without the complete set of blueprints, these complex geometric adjustments often lead to structural failure.
The precision required for these upgrades is what separates a world-class builder from a weekend hobbyist.
THE AESTHETIC-MATRIX: FINISHING TECHNIQUES
| Technique | Visual Impact | Difficulty | Best Wood Match |
|---|---|---|---|
| Round-Over Edge | Subtle Luxury | Easy | All Species |
| Inlay Banding | High Contrast | Professional | Walnut / Maple |
| Hidden Plug | Clean Lines | Moderate | Cedar / Oak |
| Burnt Grain (Shou Sugi Ban) | Rustic / Modern | Moderate | Larch / Cedar |
THE SYMMETRY PROTOCOL: BALANCING THE THRONE
Why build only one adirondack chair cup holder diy when symmetry creates a balanced aesthetic?
Our team suggests installing a matching holder on the opposite armrest for a “Command Center” feel.
One side for your beverage, and the other for your smartphone or a small tablet.
When you use the complete set of blueprints, we provide the exact layout for a “Media Slot” integration.
This transforms your adirondack chair cup holder diy into a modern workstation for the ultimate outdoor retreat.
A master builder always considers the visual weight of the chair; two holders provide a harmonious silhouette.
By following the master-level templates, you ensure both sides are perfectly mirrored in height and depth.
The result is a throne that looks as powerful as it feels comfortable.
PRO-TIP from our team:
When sanding the interior of your adirondack chair cup holder diy, wrap your sandpaper around a 3-inch PVC pipe.
This ensures a perfectly consistent curve and prevents you from creating flat spots in the circle.
This “Sand-Sleeve” method is a professional secret for achieving a factory-grade finish in tight spaces.
The final details are what define your legacy as a craftsman.
Do not rush the finish when you are so close to the finish line.
The pride of seeing your adirondack chair cup holder diy flawlessly integrated is worth every extra minute.
You can find the complete set of blueprints right here by clicking the button below.
Frequently Asked Questions: Mastering the Adirondack Chair Cup Holder DIY
Knowledge is the final layer of protection for your outdoor sanctuary.
Our team has compiled the most critical inquiries to ensure your adirondack chair cup holder diy project achieves legendary status.
1. What is the best wood for an adirondack chair cup holder diy?
Western Red Cedar and Teak are the gold standards for this project.
They contain natural oils that repel rot and insects.
If you use a softer wood like Pine, you must be 100% diligent with your epoxy sealing protocol.
Without the right timber, even the best finish will eventually fail against the elements.
2. Can I use a standard hole saw for the bore?
You can, but a master craftsman prefers a 3.25-inch Forstner bit.
Standard hole saws often cause “blowout” on the underside of the wood.
A Forstner bit shears the wood fibers cleanly, leaving a smooth interior that requires minimal sanding.
The complete set of blueprints provides the exact drill speeds for each wood species to prevent burning.
3. Why are my screws leaving black stains?
This is a tannin reaction caused by using low-grade zinc or galvanized fasteners.
When weatherproofing an adirondack chair cup holder diy, you must use Stainless Steel Grade 305 or 410.
These metals are inert and will not react with the natural acids in Cedar or Oak.
Always prioritize hardware quality to prevent permanent visual damage to your grain.
4. How do I prevent my drink from tipping on an incline?
This is an engineering challenge that is solved by the “bore offset” and support depth.
Our team mandates a minimum depth of 2.75 inches for the support shelf.
This lowers the center of gravity of the beverage, making it resistant to the slight lean of a classic Adirondack chair.
Guessing these angles often leads to spills; follow the complete set of blueprints for a perfect result.
5. Do I need to remove the cup holder in winter?
If you have used the epoxy sealing protocol and stainless hardware, your adirondack chair cup holder diy can stay outside.
However, we recommend using a vented fabric cover to prevent ice from expanding in the cavity.
Ice expansion is a powerful force that can split even the strongest timber joints.

THE MASTER’S PLANNING-TABLE: FAQ AT A GLANCE
| Question Topic | Professional Solution | Required Tool |
|---|---|---|
| Wood Choice | Heartwood (Cedar/Teak) | Visual Grain Audit |
| Fastener Staining | Use SS Grade 305/410 | Torx T20 Driver |
| Bore Quality | Use Forstner Bit | Drill Press / Impact |
| Moisture Rot | Two-Part Epoxy Seal | Natural Fiber Brush |
PRO-TIP from our team:
If you find that your adirondack chair cup holder diy bore is slightly too small for a specific mug, do not sand it by hand.
Use a spindle sander or a drum sander attachment on your drill to maintain the perfect circular geometry.
Keeping the circle true is essential for both the aesthetic and the structural integrity of the armrest.
The workshop is quiet, but the opportunity to build something permanent is loud.
Do not allow the complexity of the task to paralyze your progress.
With the right materials and the complete set of blueprints, you are already halfway to success.
The difference between a builder and a master is the courage to start the next step now.
You can find the complete set of blueprints right here by clicking the button below.
The Master’s Final Decree: Securing Your Woodworking Legacy
From Weekend Builder to Master Craftsman
The journey of a thousand cuts begins with the decision to never settle for mediocrity.
You have now absorbed the technical protocols, the material science, and the ergonomic secrets of the adirondack chair cup holder diy.
The difference between a chair that rots in the rain and a throne that survives the decades is found in the precision of the plan.
A true master understands that hope is not a strategy; only the exact geometry of a proven design can guarantee success.
Without the right roadmap, you are simply converting expensive timber into eventual firewood.
The Crossroads of Craftsmanship
Every splinter and every drop of sweat you invest deserves a result that radiates authority.
The sun is setting on the era of guesswork and “good enough” backyard projects.
You can either continue to struggle with unstable joints and failing finishes, or you can claim your seat among the elite.
The risk of structural failure is real, but the reward of a perfect, handcrafted retreat is within your reach today.
The pride of a master is not just in the building, but in the knowing that it was built to last forever.
Do not allow your legacy to be dictated by the elements or inferior instructions.
You can find the complete set of blueprints right here by clicking the button below.
🛠️ Strategic Project Variations
Whether you are adding a cup holder or building a folding version, maintaining the “Sleek Modern” aesthetic requires consistent geometry.
Our team has optimized these variations to work seamlessly with our core 2×4 and 1×6 lumber standards.
By integrating these accessories, you elevate your backyard from a simple seating area to a professional-grade outdoor living space.
Complete Your Outdoor Set:
- Main Guide: Easy DIY Modern Adirondack Chair Plans for Beginners
- Category Hub: Explore More: Easy Woodworking Projects Category
- Comfort Add-on: Modern Adirondack Chair Footrest & Ottoman Plans
- Style Comparison: Modern vs. Traditional: What’s the Difference?
- Full Library: Access 16,000 Woodworking Blueprints Here


Expert Choice by Owen Riley
Stop wasting time on poorly drawn plans. Owen hand-selects professional blueprints that guarantee a perfect fit for your project.
Access Owen's Recommended Blueprints →Database for Master Woodworkers: Blueprints, Videos & Custom Designs:
➜ OPEN THE PROJECT VAULT & CLAIM YOUR CUSTOM PLAN >>Includes: High-Fidelity 2026 Schematics + Full Material Lists


