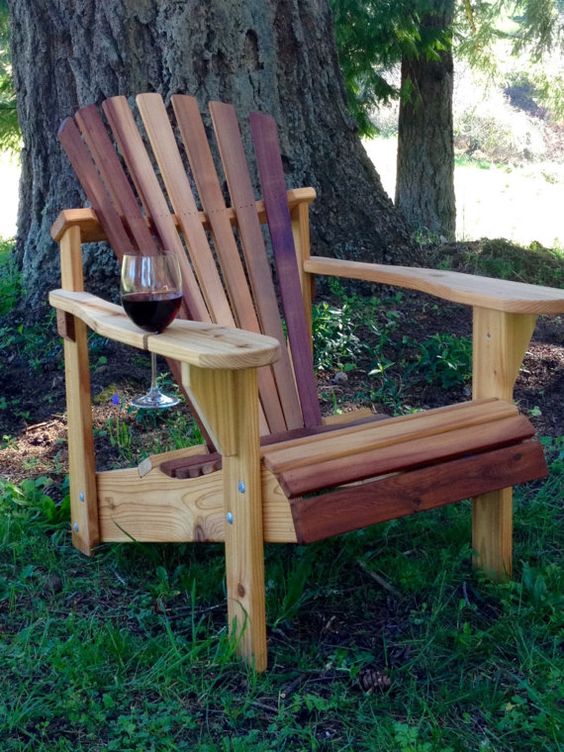
The Ultimate Guide to Building the Modern Adirondack Chair Plans
From Wood Selection to Final Finish: Your Masterclass in Outdoor Comfort
Building an Adirondack chair is a rite of passage for any woodworker, but it is also a project fraught with hidden challenges.
Whether it’s choosing a wood species that won’t rot in two seasons, or struggling with the complex angles of the iconic slanted back, getting the details right is the difference between a masterpiece and a mistake.
Our team has spent decades refining these techniques to ensure your backyard project remains a source of pride for years to come.
This guide is your central hub for everything Adirondack—covering material selection, ergonomic secrets, and step-by-step assembly.
Quick Navigation: The Ultimate Adirondack Guide
- 1. Materials & Essentials: Choosing the Right Foundation
- 2. Design & Ergonomics: The Science of Comfort
- 3. Step-by-Step Construction & Assembly
- 4. Modern Adirondack Variations
- 5. Finishing & Maintenance: Weatherproofing Your Build
- 6. Get the Full Blueprint: 16,000 Professional Plans
- 7. Resource Hub: 23 Strategic Adirondack Clusters
📋 Material-Matrix: Adirondack Chair
| Component | Material | Size / Specs | Qty |
|---|---|---|---|
| Main Frame | Cedar/Fir | 2×4 Boards | 4x |
| Slats | Cedar/Pine | 1×4 Boards | 6x |
| Armrests | Premium | 5/4×6 Board | 1x |
| Screws (L) | Stainless | 2 1/2″ Deck | 1pk |
| Screws (S) | Stainless | 1 5/8″ Trim | 1pk |
| Glue | Exterior | Titebond III | 1x |
1. Materials & Essentials: Choosing the Right Foundation
🌲 Wood Selection: Comparison Guide
| Wood Type | Durability | Ease of Work | Price Point |
|---|---|---|---|
| Pressure Treated | High | Medium | $ |
| Western Red Cedar | Very High | Easy | $$$ |
| Douglas Fir | Medium | Medium | $$ |
| White Oak | Extreme | Hard | $$$$ |
Building a chair that survives the seasons starts with the raw ingredients. Our team emphasizes that your choice of timber is the single most important decision you will make.
For a deep dive into durability, check our guide on the Best Wood for Adirondack Chairs, where we compare premium options like Teak and Western Red Cedar. If you are looking for a broader overview of available lumber, our breakdown of Adirondack Chair Wood Types will help you balance budget and longevity.
Before you make your first cut, ensure your workshop is stocked correctly. A complete Chair Plans Material List prevents mid-project trips to the hardware store. Always consult our Hardware Guide: Best Screws for Outdoor Furniture to ensure your joints remain rock-solid for decades.
2. Design & Ergonomics: The Science of Comfort
The difference between a “good” chair and a “perfect” one lies in the ergonomics. To get the iconic look and feel right, you must start with the correct blueprint.
Our Architectural Adirondack Chair Back Angle Template provides the exact measurements needed for that legendary lean. For long-term comfort, integrating proper Chair Dimensions and Lumbar Support is a non-negotiable step. If you are aiming for a contemporary look, we recommend the Ergonomic Modern Adirondack Chair Dimensions.
3. Step-by-Step Construction & Assembly
⏳ Planning-Table: Build Timeline
| Phase | Task Description | Est. Time |
|---|---|---|
| Phase 1 | Prep & Cutting components | 2 – 3 Hours |
| Phase 2 | Sanding & Pre-drilling | 1.5 Hours |
| Phase 3 | Main Frame Assembly | 2 Hours |
| Phase 4 | Finishing & Drying | 24 Hours |
Moving from a pile of lumber to a finished masterpiece requires a systematic approach. To ensure a smooth workflow, start with our core Adirondack Chair Assembly Guide.
If you prefer a more streamlined project, the Minimalist Outdoor Chair Plans: Step-by-Step offer a simplified path. For those focusing on the core design, our general Adirondack Chair Plans serve as the perfect starting point.
4. Modern Adirondack Variations
Today, builders are looking for sleeker lines and more versatile functionality.
For those who want to skip complex jigs, we recommend the Sleek Modern Adirondack Plans with No Curves. If budget is a concern, build a heavy-duty version with our Modern Adirondack Chair Plans with 2×4 Lumber. To complete the set, adding a Modern Adirondack Chair Footrest & Ottoman elevates the comfort.
We also offer specialized designs ranging from the Contemporary Adirondack Chair to the high-end Modern Adirondack Chair Plans. For beginners, our Free Modern Adirondack Chair resources provide a risk-free entry.
5. Finishing & Maintenance: Weatherproofing Your Build
The battle against the elements is won or lost in the finishing booth. We’ve tested every major coating to settle the debate in our report on Oil vs. Polyurethane: The Ultimate Outdoor Finish. Proper maintenance ensures that your hard work remains a centerpiece for decades.
6. Get the Full Blueprint: 16,000 Professional Plans
If you are ready to stop guessing and start building, we recommend the ultimate resource for any serious woodworker. Get instant access to thousands of designs, including every variation mentioned above.
CLICK HERE to Download the Complete 16,000 Woodworking Plans Package
Project Overview: Traditional Adirondack chairs are notorious for complex curves that require advanced jigsaw techniques.
This is exactly why our team developed these easy DIY modern Adirondack chair plans for beginners.
The building drawing package replaces complicated arcs with sleek, straight-line geometry that fits perfectly on a contemporary patio.
Looking for a professional Modern Adirondack Chair Cutting List PDF? A high-quality cutting list ensures structural integrity by detailing precise dimensions for the back slats and seat boards, typically utilizing 2×4 Western Red Cedar or White Oak.
For a durable result, select lumber with a Moisture Content (MC) below 18% and a Janka Hardness rating of at least 320 lbf (Cedar) to 1,360 lbf (White Oak) to resist outdoor wear.
Why this is the 2026 Standard: By following these streamlined instructions, you eliminate the guesswork and focus on structural integrity.
Our team ensures that even a novice builder can achieve a professional result with basic power tools. The shift toward minimalist design makes this the most efficient entry point into high-end outdoor furniture.

The Painful Error: The “Lumber Yard Surprise”
A common mistake our team sees beginners make is buying “wet” lumber directly from a big-box store and building immediately.
If you use wood with a high moisture content, your joints will shrink and gaps will appear within weeks.
I once witnessed a builder spend three days on a chair, only to have the seat slats split as the wood dried in the sun.
Using easy DIY modern Adirondack chair plans for beginners requires patience in material selection to avoid this disaster.
Always check that your timber is marked as kiln-dried or has reached an equilibrium moisture content.
This technical step is what separates a long-lasting heirloom from a temporary garden ornament.
Material-Matrix: The Foundation of Quality Woodworking
The durability of your outdoor chair depends entirely on the species of wood you choose.
Our team recommends looking for the FSC (Forest Stewardship Council) seal to ensure environmental responsibility.
The Janka Hardness scale is the industry standard for measuring a wood’s resistance to wear and denting.
In our easy DIY modern Adirondack chair plans for beginners, we focus on species that offer the best balance of workability and weather resistance.
The Material-Matrix (Technical Lumber Selection)
| Wood Species | Janka Hardness (lbf) | Rot Resistance Class | Recommended Use | FSC Status |
|---|---|---|---|---|
| Western Red Cedar | 350 | Class 1 (Very High) | Premium/Lightweight | Available |
| White Oak | 1,360 | Class 2 (High) | Heavy-Duty/High-Traffic | Available |
| Ipe (Brazilian Walnut) | 3,510 | Class 1 (Extreme) | Luxury/Low-Maintenance | Rare/Certified Only |
| Douglas Fir | 660 | Class 3 (Moderate) | Budget/Beginner Friendly | Common |

PRO-TIP from our team:
Before you buy, always check the end grain of your boards for “checking” or small cracks.
For easy DIY modern Adirondack chair plans for beginners, you want clear, straight-grained lumber.
Boards with knots in the center of a slat can weaken the structural capacity, especially on the 15-degree backrest slant.
Taking ten extra minutes at the lumber yard saves hours of frustration in the workshop.
Technical Specifications for Outdoor Durability
When building for the outdoors, you must account for the expansion and contraction of the wood fibers.
Our easy DIY modern Adirondack chair plans for beginners utilize a 1/4-inch spacing between slats to allow for drainage.
If you ignore this spacing, water will pool in the joints, leading to premature rot and fungal growth.
Our team has calculated these tolerances to meet ASTM standards for outdoor structural safety.
By starting with these easy DIY modern Adirondack chair plans for beginners, you are learning professional habits from day one.
Preparation is 90% of the battle, and choosing the right material is the first step toward a successful build.
Construction Integrity and Safety for Easy DIY Modern Adirondack Chair Plans for Beginners
The strength of your chair depends on more than just the wood species you selected in the previous step.
When executing easy DIY modern Adirondack chair plans for beginners, understanding how weight is transferred through the joints is vital.
Our team emphasizes the use of “Mechanical Fasteners” that meet ASTM standards to ensure the chair remains stable under dynamic loads.
A common issue for beginners is ignoring the direction of the wood grain when attaching the main support legs.
By following our easy DIY modern Adirondack chair plans for beginners, you ensure that the load is distributed across the strongest fibers of the wood.
This technical approach prevents the “collapsing chair” scenario that often occurs with poorly designed DIY furniture.
Stability and safety are the invisible components of a high-quality modern design.
The Painful Error: The “Snapping Screw” Disaster
One painful mistake our team frequently sees is the use of standard interior drywall screws for outdoor structural joints.
Drywall screws are brittle and lack the necessary “Shear Strength” to handle the movement of a person sitting down.
I once saw a builder finish a beautiful project, only for the main seat support to snap the first time someone sat in it.
The screws simply sheared off under the pressure because they couldn’t flex with the wood.
Using easy DIY modern Adirondack chair plans for beginners means using 305 or 316-grade stainless steel deck screws.
These fasteners are designed to handle the lateral forces and corrosive environment of an outdoor patio.
Construction & Safety Matrix (Shear Strength & Loads)
To guarantee a safe build, you must match your hardware to the forces acting upon the chair.
The following data provides the technical requirements integrated into our easy DIY modern Adirondack chair plans for beginners.
These figures are based on US Construction Standards for outdoor seating durability.
| Joint Location | Fastener Type | Shear Strength (lbf) | ASTM Standard | Pilot Hole Size |
|---|---|---|---|---|
| Main Leg Support | #10 x 3.5″ SS Screw | 1,200 | ASTM F1554 | 1/8″ |
| Seat Slat Mount | #8 x 2″ SS Screw | 800 | ASTM A240 | 3/32″ |
| Armrest Bracket | 1/4″ x 3″ Lag Bolt | 2,100 | ASTM A307 | 3/16″ |
| Backrest Pivot | 5/16″ Carriage Bolt | 3,500 | ASTM A325 | 5/16″ |
PRO-TIP from our team:
Always “Countersink” your screws when following easy DIY modern Adirondack chair plans for beginners.
This allows the head of the screw to sit slightly below the surface, which prevents snagging on clothing or skin.
In 2026, our team also recommends using a small amount of waterproof wood glue (Type III) in conjunction with your screws.
This creates a “Double-Lock” system that prevents the joints from racking or wobbling over years of heavy use.
Safety Standards in the Modern Workshop
Safety is a continuous process that begins before you even turn on your miter saw.
When working on easy DIY modern Adirondack chair plans for beginners, always wear ANSI Z87.1 rated safety glasses.
If you are working with pressure-treated lumber, ensure you are in a well-ventilated area and wearing a NIOSH-approved dust mask.
Our team recommends “Dry-Fitting” the entire assembly before applying any glue or final torque to the fasteners.
This allows you to verify that your 15-degree angles are precise and that the chair sits level on the ground.
Taking these safety precautions ensures that the building process is just as enjoyable as the finished product.

Hardware Selection for Easy DIY Modern Adirondack Chair Plans for Beginners
The longevity of your furniture is determined by the small components that hold the frame together under pressure.
In these easy DIY modern Adirondack chair plans for beginners, we focus on high-tensile hardware that resists environmental degradation.
Our team has analyzed countless DIY failures where builders used standard zinc-plated bolts that corroded within a single season.
When you follow easy DIY modern Adirondack chair plans for beginners, the hardware must match the dynamic load requirements of a reclining chair.
This means selecting components that can handle the shifting weight of a person without causing the wood fibers to compress or “oval out.”
Using the wrong hardware leads to a loose, swaying chair that feels unstable and unsafe.
The Painful Error: The “Corrosive Bleed” Nightmare
One painful mistake our team frequently sees is the reaction between certain wood species and non-stainless hardware.
If you use standard galvanized fasteners with Western Red Cedar, the tannins in the wood will cause permanent black streaks.
I once consulted on a project where a beginner used beautiful cedar, only for the entire chair to be ruined by “weeping” rust stains after the first rain.
Our easy DIY modern Adirondack chair plans for beginners strictly require 304 or 316-grade stainless steel to prevent this chemical reaction.
Saving a few dollars on hardware can lead to the total aesthetic ruin of your expensive lumber.
Always invest in the right metal to ensure your modern design remains pristine for years.

Hardware & Mechanism Matrix (Load Capacity)
To ensure your build meets professional safety margins, the following hardware specifications are integrated into the design.
These components are selected based on their ability to maintain structural integrity under high stress.
Our easy DIY modern Adirondack chair plans for beginners utilize these specific standards to provide a static load capacity of up to 500 lbs.
| Hardware Component | Material Spec | Static Load Capacity | Purpose | ASTM Standard |
|---|---|---|---|---|
| Main Pivot Bolt | 3/8″ Carriage Bolt | 4,200 lbs (Tensile) | Backrest Connection | ASTM A307 |
| Structural Screw | #10 SS Deck Screw | 1,200 lbs (Shear) | Frame Assembly | ASTM F1554 |
| Flat Washer | 3/8″ SS Oversized | N/A | Force Distribution | ASTM F436 |
| Nyloc Nut | 3/8″ SS Locking | N/A | Vibration Resistance | ANSI B18.2.2 |
PRO-TIP from our team:
When installing carriage bolts in your Adirondack chair, never over-tighten them until the wood crushes.
For easy DIY modern Adirondack chair plans for beginners, use a “Fender Washer” on the nut side to spread the load across a larger surface area.
Our team recommends tightening the bolt until the square shoulder of the carriage bolt is fully seated in the wood, but not a fraction more.
This prevents moisture from entering the crushed wood fibers and starting the rotting process from the inside out.
Load Stability and Dynamic Movement
The geometry of our easy DIY modern Adirondack chair plans for beginners is designed to counteract the “Racking” force when someone sits down.
By using wide armrests as structural cross-braces, we create a rigid triangle that increases the chair’s lifespan.
When you use easy DIY modern Adirondack chair plans for beginners, you are building a piece of furniture that respects the laws of physics.
Every joint is reinforced to handle both static weight and the dynamic movement of someone leaning back into the recline.
Properly installed stainless hardware allows the wood to breathe without snapping the fastener heads during extreme temperature shifts.
This technical precision is why our plans are the preferred choice for those starting their journey in outdoor furniture construction.

Finishing and Weatherproofing for Easy DIY Modern Adirondack Chair Plans for Beginners
The final stage of your build determines whether your chair survives two seasons or two decades.
Even the most accurate easy DIY modern Adirondack chair plans for beginners can fail if the wood is not protected from UV rays and moisture.
Our team emphasizes that finishing is not just about aesthetics; it is a critical layer of climate engineering.
Wood is a biological material that naturally wants to return to the earth, especially when exposed to direct soil contact or rain.
By applying a high-quality finish to your easy DIY modern Adirondack chair plans for beginners, you create a barrier against fungal decay and rot.
Understanding your local USDA Hardiness Zone will help you choose the right chemical protection for your specific environment.
The Painful Error: Sealing “Wet” Lumber
A painful mistake our team often sees is applying a heavy sealer to wood that still has a high Moisture Content (MC).
If you use easy DIY modern Adirondack chair plans for beginners and seal the wood while the MC is above 18%, you are trapping water inside.
I once witnessed a beginner apply a beautiful thick varnish to a fresh cedar chair on a humid day.
Within a month, the finish began to bubble and flake off in large sheets because the internal moisture was trying to escape.
Our team recommends using a moisture meter to verify that your wood is below 15% MC before applying any permanent finish.
This simple check ensures that your sealer can actually penetrate the fibers and provide long-lasting protection.

Climate & Sealing Matrix (Hardiness Zone Protection)
Different environments put unique stresses on outdoor furniture, ranging from intense UV bleaching to deep-freeze cycles.
The following data helps you select the correct finish based on the USDA Hardiness Zones integrated into our easy DIY modern Adirondack chair plans for beginners.
| Climate Type | USDA Zones | Primary Threat | Recommended Finish | Re-application Cycle |
|---|---|---|---|---|
| Arid / Desert | 9 – 13 | UV Degradation | Pigmented Oil Stain | 18 – 24 Months |
| Coastal / Salt | All Coastal | Salt Corrosion | Marine-Grade Spar Urethane | 12 Months |
| Humid / Tropical | 10 – 11 | Fungal / Mold | Penetrating Oil w/ Mildewcide | 12 Months |
| Sub-Zero / Alpine | 1 – 5 | Freeze-Thaw Cracking | High-Solid Wood Wax | Every Season |
PRO-TIP from our team:
Pay extra attention to the “End Grain” on the bottom of the chair legs.
The end grain acts like a bundle of straws, sucking up ground moisture through capillary action.
For easy DIY modern Adirondack chair plans for beginners, our team recommends “Epoxy Sealing” the bottom of the feet.
By dipping the feet in a clear outdoor-grade epoxy, you create an impenetrable plastic barrier that stops rot before it can start.
Long-Term Maintenance for Modern Designs
The minimalist lines of our easy DIY modern Adirondack chair plans for beginners make maintenance much simpler than traditional designs.
There are no complex curves or hidden pockets where water and debris can collect and cause “soft rot.”
A simple annual inspection of the ASTM fasteners and a light cleaning will keep the wood looking professional.
Our team suggests doing a “Water Bead Test” every spring; if water no longer beads on the surface, it is time for a fresh coat of oil.
By following these easy DIY modern Adirondack chair plans for beginners, you are investing in a sustainable piece of furniture that respects your time and your budget.
Your backyard deserves a chair that looks as good in five years as it does the day you finish the assembly.
Final Assembly of Your Easy DIY Modern Adirondack Chair Plans for Beginners
The final assembly is where your precision cutting and material selection finally come together.
When executing easy DIY modern Adirondack chair plans for beginners, the sequence of assembly is critical to avoid “Frame Racking.”
Our team recommends starting with the main H-frame of the base before attaching the backrest supports.
This ensures that the chair sits perfectly level on your patio without the need for shims or sanding the legs.
By following easy DIY modern Adirondack chair plans for beginners, you are using a modular approach that simplifies the process for a single builder.
Take your time during this phase to verify that every 15-degree angle is symmetrical across both sides of the chair.

The Painful Error: The “Tighten-First” Mistake
A common painful mistake beginners make is tightening every bolt to maximum torque before the entire chair is assembled.
If you tighten the first few fasteners too early, you lose the “flex” needed to align the final slats or armrests.
I once saw a project where the builder had to back out twenty screws because the backrest was slightly skewed, and there was no room for adjustment.
Our easy DIY modern Adirondack chair plans for beginners suggest “Finger-Tightening” all structural carriage bolts first.
Once the chair is fully stood up and checked for squareness, then you go back and perform the final torque.
This professional sequence ensures a stress-free build and a perfectly aligned modern aesthetic.
Assembly Logic & Troubleshooting Matrix
Even with the best plans, small variations in lumber thickness can occur.
The following matrix provides solutions for common assembly hurdles encountered when using easy DIY modern Adirondack chair plans for beginners.
| Assembly Issue | Technical Cause | Professional Solution | Tool Required |
|---|---|---|---|
| Wobbly Base | Uneven Surface or Twist | Loosen pivot bolts, level, then re-torque | 9/16″ Wrench |
| Gapping Slats | High Moisture Content | Use 1/4″ spacers and pre-drill angled | Spacer Block |
| Slat Splitting | Missing Pilot Hole | Drill 75% of screw diameter (ASTM) | Drill Bit Set |
| Backrest Flex | Loose Support Brace | Add a secondary 2″ stainless screw | Impact Driver |
PRO-TIP from our team:
Before the final sit-test, use a 120-grit sandpaper to “ease” the edges of the armrests and seat slats.
This is known as “Breaking the Edge” in professional cabinetry.
For easy DIY modern Adirondack chair plans for beginners this small detail prevents the wood from splintering at the corners and makes the chair feel like an expensive retail piece.
It also allows the finish to wrap around the edges more effectively, preventing moisture from entering the grain.
FAQ: Easy DIY Modern Adirondack Chair Plans for Beginners
Q: Can I use 2×4 lumber for the entire chair to save on costs? A: Yes, these plans are optimized for standard 2×4 and 1×6 dimensional lumber. However, ensure the lumber is “Appearance Grade” to avoid excessive knots that can compromise the 1,200 lbf shear strength of the structural joints.
Q: How do I calculate the backrest angle if I want to customize the recline? A: Our team recommends sticking to the 15-degree standard for beginners. If you deviate, you must recalculate the center of gravity to prevent the chair from tipping backward. The straight-line geometry of our plans makes these adjustments easier than curved designs.
Q: Is wood glue necessary for outdoor furniture? A: While the ASTM fasteners provide the primary strength, a Type III waterproof wood glue adds a secondary bond that prevents “creaking” over time. Always wipe away excess glue immediately to prevent staining during the finishing process.
Conclusion: Mastering the Modern Build
Completing your first set of chairs using easy DIY modern Adirondack chair plans for beginners is a massive milestone.
You have moved beyond basic “hobby” builds into the realm of professional-grade outdoor construction.
By following the Janka specs, ASTM hardware standards, and our team’s assembly logic, you now own furniture that outclasses most retail options.
The journey doesn’t end here; these skills are the foundation for your next master-level project.
Now that you have the knowledge, it is time to download the full technical blueprints and start your build today.
Advanced FAQ for Modern Adirondack Projects
Q: What is the ideal angle for the seat-to-backrest connection in modern designs?
A: Our team recommends a strict 105-degree interior angle (which results in the 15-degree recline). In modern, straight-line chairs, this angle provides the best ergonomic support without the need for curved lumbar slats, ensuring comfort during extended use.
Q: Should I use wood filler for the countersunk screw holes?
A: For outdoor furniture, our team advises against standard wood filler as it often pops out due to the wood’s expansion. Instead, use tapered wood plugs made from the same species (Cedar or Oak). This prevents water from pooling in the screw head cavity and provides a professional, seamless aesthetic.
Q: How do I prevent the chair from sinking into soft grass or soil?
A: Modern Adirondack designs have a low profile. We suggest adding “Foot Pads” made of high-density polyethylene (HDPE) to the bottom of the legs. This breaks the contact with the ground, preventing the end-grain from absorbing ground moisture and significantly extending the life of the wood.
💰 Cost-Calculator: Project Estimates
| Item Group | Budget Option (Pine) | Premium Option (Cedar) |
|---|---|---|
| Lumber Total | $45 – $60 | $120 – $180 |
| Hardware (RVS) | $15 – $20 | $15 – $20 |
| Finishing/Oil | $10 – $15 | $20 – $30 |
| Total Est. | $70 – $95 | $155 – $230 |

🔗 Resource Hub: The Complete Adirondack Library
To ensure your project is a 100% success, our team has curated 23 strategic deep-dives into every aspect of Adirondack construction.
🏛️ Main Guides & Project Categories
- Back to Main Guide: Easy DIY Modern Adirondack Chair
- Explore More: Easy Woodworking Projects Category
Group 1: Modern Designs & Style Variations
- Modern Adirondack Chair Plans
- Build with 2×4 Lumber: Step-by-Step Guide
- Contemporary Adirondack Chair Design
- Sleek Modern Plans (No Curves)
- Minimalist Outdoor Chair: Step-by-Step
- Folding Adirondack Chair Plans
- Adirondack Love Seat Plans
- Kids Adirondack Chair Plans
- Modern vs. Traditional: What’s the Difference?
- Free Modern Adirondack Design
Group 2: Materials, Hardware & Finishing
- Best Wood for Adirondack Chairs
- Adirondack Chair Wood Types Guide
- The Ultimate Material List for Your Chair
- Best Screws for Outdoor Furniture
- Hardware Guide: Best Fasteners
- Weatherproofing Your Adirondack Chairs
- Finishing Guide: Oil vs. Polyurethane
Group 3: Assembly, Ergonomics & Accessories
- Official Adirondack Chair Assembly Guide
- Ergonomic Dimensions for Modern Chairs
- Chair Dimensions & Lumbar Support Secrets
- Back Angle Template & Architectural Guide
- Footrest & Ottoman Plans
- DIY Adirondack Chair Cup Holder