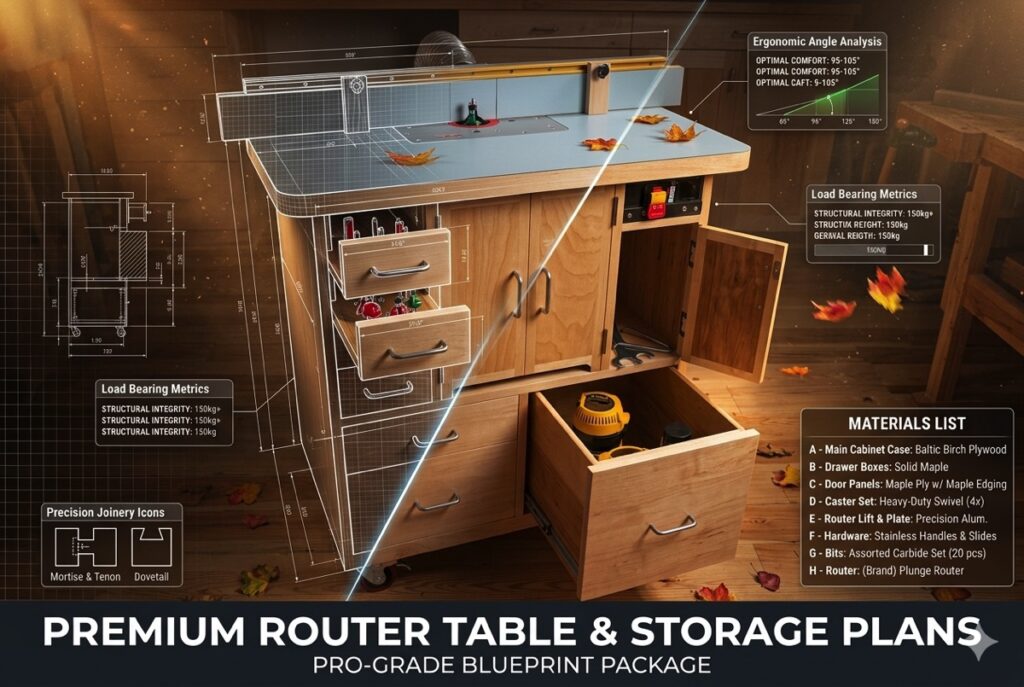
Project Blueprint Details
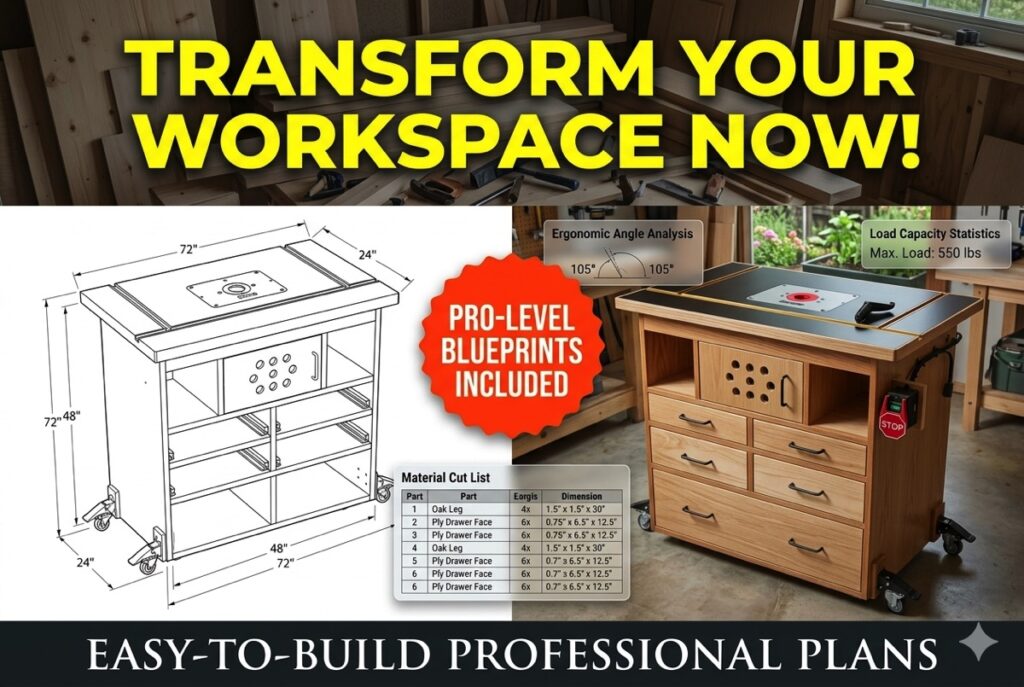
Stop guessing measurements. Get the exact cut lists and 3D diagrams to finish this project without mistakes.
ACCESS COMPLETE PROJECT VAULT >>I still remember the first time I mounted a small trim router to a scrap piece of plywood and called it a “table.” Within ten minutes of routing a simple chamfer, the high-frequency vibration had numbed my fingertips, and the “table” was walking across my workbench like it had a mind of its own. That was thirty years ago, and it taught me a lesson I carry into every build: a compact router table storage station isn’t just a box that holds a tool; it is a specialized piece of industrial machinery that must manage immense kinetic energy in a small footprint.
When we talk about a compact router table storage station, we are dealing with motors that spin at upwards of 25,000 RPM. This creates a specific type of harmonic resonance that can wreak havoc on your joinery. If your station is too light or poorly constructed, that vibration translates directly into “chatter” marks on your wood, meaning you’ll spend twice as much time sanding as you did routing. To avoid this, I have moved away from simple butt joints and softwoods, focusing instead on mass-loading and rigid internal geometry.
The foundation of any serious station must be the torsion box. In my experience, sandwiching a grid of internal ribs between two skins of 19mm / 3/4” Baltic Birch plywood is the only way to ensure the top stays dead-flat over years of use. Unlike solid timber, which breathes and moves with the seasons, a well-engineered plywood torsion box provides the dimensional stability required for precision work. I prefer Baltic Birch because of its density; if you look at the Janka scale, you’ll see it possesses the structural integrity to hold onto fasteners even under the constant stress of a vibrating motor.
Material-Matrix: Structural Integrity for Router Stations
| Component | Recommended Material | Density / Janka | Primary Benefit |
|---|---|---|---|
| Main Carcass | Baltic Birch Plywood | 1,260 lbf | Resonance Dampening |
| Work Surface | Phenolic Faced MDF | 800 – 1,000 kg/m³ | Low Friction Co-efficient |
| Internal Ribbing | Poplar or Birch | 540 – 1,260 lbf | Torsional Rigidity |
I’ve seen many hobbyists make the mistake of using standard drywall screws for their assembly. In a high-vibration environment, those screws eventually fatigue and snap, or worse, they slowly “hog out” the wood fibers until the joint becomes sloppy. I have transitioned almost entirely to using Torx TX25 drive systems for my cabinet joinery. The six points of contact allow me to drive the screw with significantly more torque, effectively pre-loading the joint so it acts as a single, monolithic unit. This rigidity is what keeps your fence perfectly parallel to the miter slot, cut after cut.
Another nuance that is often overlooked is the “Acoustic Decoupling” of the station. When I build a compact router table storage station, I incorporate a ballast chamber at the very bottom. By filling a sealed lower compartment with kiln-dried sand or lead shot, you significantly lower the center of gravity. This extra mass absorbs the high-frequency energy that would otherwise resonate through your shop floor, making the tool much quieter and safer to operate. It is a small detail that separates a “shop project” from a professional-grade workstation.
If you are serious about achieving this level of shop performance, you should study these professional workshop blueprints for your compact router table storage station to ensure your dimensions and material thicknesses are spot on before you make your first cut.
Technical Hardware & Fastener Calibration
| Fastener Type | Material | Drive System | Torque Level |
|---|---|---|---|
| Structural Screw | SS 410 Stainless | Torx TX25 | High (Pre-loaded) |
| Machine Bolt | Zinc Plated Steel | Hex / Allen | Medium (Leveling) |
| Friction Bolt | Black Oxide | Star Knob | Low (Fence Micro-adjust) |
Beyond the structural frame, we must address the “heat-sink” effect. A compact router motor is cooled by an internal fan that pulls air through the housing. When you trap that motor inside a wooden box, you are essentially creating an oven. Over the years, I’ve replaced more bearings than I’d like to admit because of poor airflow. Your compact router table storage station needs a dedicated intake vent that provides at least 50mm / 2” of clearance around the motor. This doesn’t just protect the tool; it ensures the air being pulled into your dust extractor is actually removing the thermal energy away from the bit.
The scent of scorched Maple is a sure sign that your feed rate is too slow or your motor is struggling with heat buildup. By engineering a station that manages both vibration and temperature, you are not just building a place to store your tool—you are creating a precision environment where the wood responds to the cutter with a clean, crisp “hiss” rather than a labored scream. If you’ve ever felt the difference between a bit that is struggling and one that is gliding, you know exactly what I mean.
This deep-dive into the “why” behind the construction is what ensures your station will outlast your current router. In the next section, I want to discuss the specifics of dust chamber CFM and the internal organization that keeps your bits organized and protected from moisture. For now, take a moment to check out these detailed workshop plans so you can visualize the torsion box and ballast chamber assembly we just discussed.
Advanced Internal Architecture: Dust Dynamics and Bit Protection
In my thirty years of standing over a router table, I have learned that what happens inside the cabinet is just as important as the surface quality on top. A common mistake I see in many compact router table storage station builds is a lack of focus on the internal “dust bowl.” If you allow fine particulate to swirl around the motor intake, it acts like sandpaper on the internal components. I’ve had to tear down motors mid-project just to clean out packed sawdust that was causing the brushes to arc.
To prevent this, I design a sloped floor inside the motor chamber. This encourages chips to migrate toward the 101.6mm / 4” extraction port rather than settling in the corners. By creating a high-velocity “vortex” effect, you ensure that the CFM (Cubic Feet per Minute) stays consistent. When your dust collector hums and you see that chamber stay clean, you know your bearings are operating in a safe, cool environment. This is the kind of longevity you simply don’t get with a basic open-shelf design.
Airflow & Extraction Efficiency Matrix
| Extraction Point | Port Diameter | Velocity Required | Goal |
|---|---|---|---|
| Fence Shroud | 63.5mm / 2.5” | High | Source Capture (Chips) |
| Internal Chamber | 101.6mm / 4” | Medium-High | Thermal Management |
| Passive Intake | 50.8mm / 2” | Ambient | Motor Air Supply |
➜ Building a system with these specific airflow requirements is easier when you follow a proven blueprint for your compact router table storage station.
Organization is the next pillar of a professional compact router table storage station. I used to keep my bits in their original plastic cases, scattered in a drawer. It was a nightmare. Moisture would get trapped inside, and within a month, my expensive carbide-tipped bits would show signs of surface rust. Now, I dedicate the side wings of the station to vertical bit-storage drawers. I use a “bit block” system—3/4” thick scraps of hardwood with holes bored to fit 1/4” and 1/2” shanks.
I’ve found that spacing these holes at least 38mm / 1.5” apart is the sweet spot; it gives you enough room to grab the bit by the shank without slicing your fingers on the neighboring cutters. It’s a simple human-centric design choice that makes a long day in the shop much more pleasant. When you open that drawer and see twenty perfectly organized bits, you aren’t just saving time; you are protecting an investment that can easily run into the hundreds of dollars.
Maintenance & Calibration Checklist
- Insert Plate Leveling: Use a feeler gauge to ensure the plate is 0.05mm / 0.002” below the table surface on the in-feed side and flush on the out-feed side.
- Fence Parallelism: Verify that the fence is square to the miter slot using a precision square to prevent “wedging” during cuts.
- Lubrication: Keep the height adjustment threads clean; a dry PTFE spray is better than oil as it won’t attract sawdust.
- Bit Depth: Always leave a 3mm / 1/8” gap between the bit shank and the bottom of the collet to allow for thermal expansion.
- Safety Switch: Position your NVR (No-Volt Release) switch at hip height so you can hit it with your body in an emergency.
- Warp Check: Periodically check the torsion box with a straightedge; if you used 19mm / 3/4” Baltic Birch, it should stay true for decades.
- ➜ For a complete list of materials and step-by-step assembly, access the master woodworking library here.
Finally, don’t overlook the “feel” of the fence. A professional compact router table storage station should have a fence that glides on T-tracks but locks down with the authority of a vault door. I always use Torx TX25 fasteners to secure the tracks into the tabletop. The scent of fresh wax on a Maple fence face is one of my favorite shop smells—it tells me the wood will slide without friction and my hands will stay safe, far away from the spinning carbide.
Building your own station is a rite of passage. It’s about taking control of your workshop’s precision. When you finish this build, you’ll find that your routing becomes more intuitive, your joints tighter, and your shop time more productive. If you’re ready to stop struggling with makeshift setups and start building for real accuracy, getting the right plans is your first step toward success.
Frequently Asked Questions (FAQ)
Can I use a larger router in a compact router table storage station?
Technically yes, but the station’s footprint and cooling must be adjusted. Compact stations are engineered for trim routers; a 3HP motor requires much more mass to dampen the increased vibration and significantly more CFM for cooling.
Why is Baltic Birch preferred over standard plywood?
Standard plywood has internal voids (holes) that can trap moisture and cause warping. Baltic Birch is void-free and has more layers per mm, making it much stiffer and better at absorbing the high-frequency resonance of a router.
How often should I clean the internal dust chamber?
Even with a vacuum, you should blow out the motor chamber with compressed air once a week. Fine dust can bypass even the best extraction systems and settle inside the motor housing, leading to overheating.
What is the advantage of Torx over Phillips for this build?
The Torx TX25 drive prevents cam-out (the bit slipping out of the screw). In a vibration-heavy tool like a router table, you need to be able to apply high torque to ensure the cabinet doesn’t shake itself apart over time.
Elevate Your Workshop Infrastructure
Once you’ve mastered the precision of your router station, the next step in creating a professional-grade environment is addressing the broader workflow of your shop. I’ve found that a truly efficient workspace is built on a foundation of cohesive systems. For a comprehensive look at how I structure a high-performance shop from the ground up, explore our master guide on Workshop Organization Plans. Whether you are just beginning to browse our Woodworking Homepage or looking for specialized Workshop Solutions & Equipment, the key is to eliminate friction between your tools and your projects.
To further optimize your space, I recommend integrating these technical shop builds:
- Vertical Space Optimization: Stop leaning offcuts against the wall and reclaim your floor space with these Vertical Lumber Storage Plans, or create a modular tool wall using our proven French Cleat Plans.
- Mobile Tool Efficiency: In smaller shops, mobility is everything. I highly recommend building a Flip Top Tool Stand for your benchtop machines or a Rolling Miter Saw Station to handle long stock with ease.
- Specialized Storage Systems: Keep your high-value assets protected and organized with Power Tool Cabinet Blueprints or a dedicated Benchtop Tool Storage Pedestal. For small hardware and hand tools, our Workshop Drawer Cabinet Plans offer the structural rigidity needed for heavy shop use.
- Material Handling & Management: Managing large panels is a safety concern; our Sheet Goods Cart Blueprints make moving plywood a one-man job. If you’re looking to bring your digital design work into the shop, consider building the DIY Mobile Shop Office.
By connecting these shop systems, you’re not just building furniture—you’re engineering a workflow that allows for better focus, higher safety standards, and more time spent on the actual craft of woodworking.

Expert Choice by Owen Riley
Stop wasting time on poorly drawn plans. Owen hand-selects professional blueprints that guarantee a perfect fit for your project.
Access Owen's Recommended Blueprints →Database for Master Woodworkers: Blueprints, Videos & Custom Designs:
➜ OPEN THE PROJECT VAULT & CLAIM YOUR CUSTOM PLAN >>Includes: High-Fidelity 2026 Schematics + Full Material Lists


