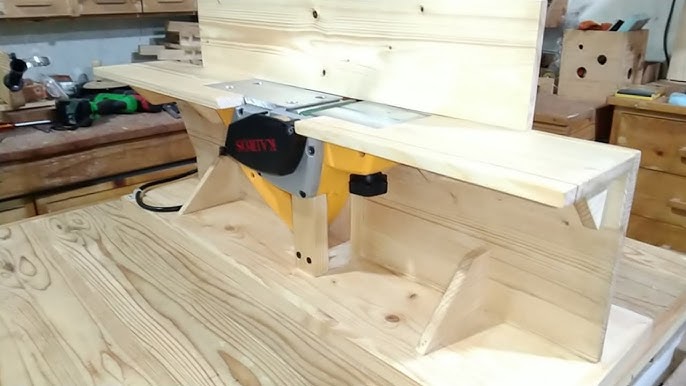
Creating a dual side benchtop jointer involves some woodworking skills and tools.
A jointer is a woodworking tool used to straighten and flatten the faces of boards, making them suitable for creating flat, even surfaces for woodworking projects.
A dual side benchtop jointer would typically have two cutting heads to allow for more efficient and versatile jointing. Here’s a general guide on how you might approach building one:
Please note that this is a complex project and should be undertaken by experienced woodworkers who are familiar with the necessary safety precautions.

Materials and Tools You’ll Need:
Materials:
- Plywood or hardwood boards for the base and frame
- Aluminum or steel extrusions for the fence
- Cutterheads and blades (likely purchased, as manufacturing these accurately is complex)
- Bearings for the cutterheads
- Bolts, screws, and nuts
- Wood glue
- Safety equipment (goggles, dust masks, etc.)
Tools:
- Table saw
- Miter saw or circular saw
- Router (for creating slots and grooves)
- Drill and bits
- Wrenches and screwdrivers
- Clamps
- Woodworking jigs (for creating accurate cuts)
- Measuring tools (ruler, tape measure, etc.)
- Safety gear (goggles, ear protection, etc.)
Steps:
- Design and Planning:
- Plan out the dimensions of your jointer based on the available space and the materials you have. Consider the size of the boards you’ll be jointing.
- Design the base, frame, fence, and cutterhead placements. Ensure that everything is square and accurate for proper functionality.
- Base and Frame:
- Cut the plywood or hardwood into the appropriate sizes for the base and frame.
- Assemble the base and frame using wood glue and screws. Make sure the frame is sturdy and square.
- Fence Assembly:
- Use aluminum or steel extrusions to create the fence. These need to be accurately aligned and securely attached to the frame.
- The fence should be adjustable to control the depth of cut. Use bolts and knobs for adjusting and locking the fence in place.
- Cutterhead Assembly:
- Install the bearings onto the cutterheads. Follow manufacturer instructions for proper installation.
- Attach the cutterheads to the frame, ensuring they are aligned parallel to each other and perpendicular to the bed.
- Motor and Power Transmission (Optional):
- If your jointer will be powered, you’ll need a suitable motor and a way to transmit power to the cutterheads. This could involve pulleys, belts, and a motor mount.
- Safety Features:
- Integrate safety features like a blade guard and an emergency stop button. Safety should always be a top priority.
- Testing and Calibration:
- Before using the jointer, carefully check all alignments, measurements, and adjustments.
- Power up the jointer and test it on scrap wood to ensure everything is working as intended.
- Finishing Touches:
- Sand, finish, and seal the wooden components of the jointer to protect them from wear and tear.
Remember, building a dual side benchtop jointer is a complex project that requires a good understanding of woodworking techniques, safety precautions, and the use of power tools.

If you’re not experienced in woodworking, it might be safer and more practical to purchase a commercial jointer.
How to Make a Dual Side Benchtop Jointer 50 tips
Planning and Design:
- Research thoroughly before starting the project to understand the principles of jointer design and function.
- Decide on the size of the jointer based on the available workspace and the size of the boards you’ll be working with.
- Sketch out detailed plans, including dimensions, measurements, and material lists.
- Consider the type of wood you’ll be using for the base, frame, and other components. Hardwood is preferable for durability.
- Choose the type of cutterheads you’ll use. Purchasing pre-made cutterheads is recommended due to their complexity.
- Determine the type of power transmission you’ll use if you’re adding a motor to the jointer.
- Plan the placement of the dual cutterheads and the adjustable fence for optimal functionality.
Safety Precautions:
- Wear appropriate safety gear, including safety glasses, ear protection, and a dust mask, at all times.
- Work in a well-ventilated area to minimize dust inhalation and fumes.
- Keep a fire extinguisher nearby, especially if you’ll be using power tools.
Materials and Tools:
- Use high-quality materials for durability and precision.
- Invest in accurate measuring tools, such as a combination square, calipers, and a dial indicator.
- Make sure you have all necessary woodworking tools, including saws, drills, routers, and clamps.
- A jointer-specific jig or sled might be necessary for certain cuts, like creating slots or grooves.
- Have extra blades and bearings on hand in case of any mishaps during assembly.
Assembly:
- Take your time during each step of the assembly process to ensure accuracy.
- Double-check measurements before making any cuts to avoid mistakes.
- Use a flat surface and carpenter’s square to ensure the base and frame are square and level.
- Attach the cutterheads using precise measurements and ensure they are parallel to each other.
- Use wood glue and clamps to securely fasten components together. Allow sufficient drying time.
- Ensure that all bolts, screws, and nuts are properly tightened, but avoid over-tightening.
Fence and Adjustment:
- Design the fence to be adjustable for depth of cut and squareness to the bed.
- Incorporate locking mechanisms for the fence adjustments to prevent any movement during operation.
- Make sure the fence is perpendicular to the bed to ensure accurate jointing.
- Test the fence’s movement and adjustments thoroughly before using the jointer.
Motor and Power Transmission (if applicable):
- If you’re adding a motor, ensure it’s properly mounted and aligned for efficient power transmission.
- Use appropriate pulleys and belts to transfer power from the motor to the cutterheads.
- Include a power switch and emergency stop button within easy reach.
Testing and Calibration:
- Test the jointer on scrap wood before using it on valuable pieces.
- Check the alignment of the cutterheads using a straightedge and adjust if necessary.
- Calibrate the fence and depth of cut to achieve desired results.
- Pay attention to the noise and vibrations during testing; any unusual sounds might indicate misalignment.
Safety Features and Maintenance:
- Install a blade guard to prevent accidental contact with the rotating cutterheads.
- Keep the jointer clean and free from debris to maintain optimal performance.
- Regularly inspect and tighten all components to ensure safety and precision.
Finishing Touches:
- Sand all wooden surfaces to avoid splinters and ensure a smooth finish.
- Apply a protective finish, such as varnish or polyurethane, to the wooden components to enhance durability.
- Label any moving parts or adjustments for quick reference.
Expertise and Skill:
- This project is best undertaken by experienced woodworkers due to its complexity.
- If you’re a beginner, consider working on smaller woodworking projects before attempting a jointer build.
Resources:
- Consult woodworking forums and communities for advice and guidance.
- Watch instructional videos related to jointer construction to get visual insights.
Patience and Persistence:
- Take breaks when needed to maintain focus and prevent fatigue.
- Be prepared for challenges and setbacks; don’t rush the process.
Budget:
- Plan your budget carefully, considering not only materials but also any specialized tools you might need to purchase.
Safety Protocols:
- Keep a first aid kit on hand in case of minor injuries.
- Have a phone nearby in case of emergencies.
Continuous Learning:
- Be open to learning from mistakes and adjusting your approach accordingly.
- Each woodworking project contributes to your skillset, so view it as a learning experience.
Pride in Your Work:
- Building a dual side benchtop jointer is a significant accomplishment. Take pride in your creation and enjoy the enhanced capabilities it brings to your woodworking projects.
Remember that safety is paramount, and if you’re not experienced with woodworking or power tools, consider seeking guidance from a professional or choosing a simpler project to start with.
How to Make a Dual Side Benchtop Jointer with woodworking plans
Creating detailed woodworking plans for a dual side benchtop jointer requires careful consideration of every aspect of the project. Here’s an outline of the key components you’ll need to include in your plans:

1. Introduction:
- Briefly describe the purpose of the project: building a dual side benchtop jointer.
- Emphasize the importance of safety and skill for anyone attempting this project.
2. Materials and Tools:
- Provide a comprehensive list of all materials required, including dimensions and quantities for each component.
- List all the necessary tools for the project, from basic hand tools to power tools and safety equipment.
3. Dimensions and Measurements:
- Detail the dimensions of the jointer, including the overall size, width, length, and height.
- Include measurements for the base, frame, fence, cutterheads, and any other components.
4. Cutting and Preparation:
- Provide cutting diagrams for each piece of wood, specifying dimensions and angles for accurate cuts.
- Include tips for preparing the materials, such as planing or sanding rough edges.
5. Assembly Steps:
- Outline the step-by-step assembly process, starting with the base and frame.
- Detail the process of attaching the fence, cutterheads, bearings, and any other components.
- Include clear, labeled diagrams to illustrate each step.

6. Joinery and Fastening:
- Explain the type of joinery you’ll be using, such as screws, wood glue, or dowels.
- Provide guidance on properly aligning and fastening components for stability and strength.
7. Adjustment Mechanisms:
- Describe how to create adjustable mechanisms for the fence, including the necessary hardware.
- Explain how to ensure the fence is square to the bed and parallel to the cutterheads.
8. Motor and Power Transmission (if applicable):
- Detail the installation of the motor, including mounting and alignment.
- Explain the power transmission setup using pulleys, belts, and any other components.
9. Safety Features:
- Provide instructions for installing safety features like blade guards and emergency stop buttons.
- Emphasize the importance of safety gear and safe working practices throughout the project.
10. Testing and Calibration:
- Explain how to test the jointer’s functionality on scrap wood before using it on actual projects.
- Describe the process of calibrating the cutterheads, fence, and depth of cut for optimal performance.
11. Finishing and Maintenance:
- Include steps for sanding and finishing the wooden components for a polished look.
- Provide tips for maintaining the jointer over time to ensure longevity and consistent performance.
12. Tips and Troubleshooting:
- Offer additional tips, such as handling difficult cuts or troubleshooting common issues.
- Provide solutions for potential challenges that might arise during construction.
13. Safety Guidelines:
- Dedicate a section to comprehensive safety guidelines, including wearing appropriate gear, proper tool usage, and precautions while working with power tools.
14. Glossary and References:
- Include a glossary of woodworking terms to assist beginners.
- List any references or resources you used to create the plans, such as books, websites, or videos.
15. Diagrams and Illustrations:
- Include detailed, labeled diagrams and illustrations throughout the plans to visually guide users.
16. Notes and Annotations:
- Add notes and annotations to key steps or components that require extra attention or clarification.
Remember that clear communication is key when creating woodworking plans.
Your goal is to provide a step-by-step guide that allows woodworkers of varying skill levels to successfully build the dual side benchtop jointer while ensuring their safety throughout the process.
If you’re not confident in creating plans yourself, consider seeking help from experienced woodworkers or using software designed for creating woodworking plans.

How to Make a Dual Side Benchtop Jointer 25 pros
Creating a dual side benchtop jointer offers several advantages for woodworking enthusiasts looking to enhance their craftsmanship and achieve precision in their projects. Here are 25 pros of making a dual side benchtop jointer:
- Versatility: A dual side jointer allows you to work with larger and wider boards, increasing the versatility of your projects.
- Flat and Smooth Surfaces: The jointer helps you achieve flat and smooth surfaces on your boards, essential for precise woodworking.
- Edge Jointing: With two cutting heads, edge jointing becomes more efficient and accurate.
- Face Jointing: Dual cutterheads ensure even face jointing, resulting in better glue-ups and assemblies.
- Consistent Thickness: You can achieve consistent board thicknesses, which is crucial for projects like cabinet making.
- Reduced Snipe: Dual cutterheads can minimize or eliminate snipe, where the cutterhead cuts too deeply at the beginning or end of the board.
- Efficient Stock Preparation: You can efficiently prepare rough lumber, saving time and effort.
- Time Savings: Dual cutterheads allow for faster material removal, speeding up your woodworking process.
- Reduced Tearout: Properly adjusted jointer blades can significantly reduce tearout, ensuring cleaner cuts.
- Improved Joinery: Accurate jointed edges and faces contribute to tighter and more stable joinery.
- Enhanced Precision: A well-calibrated jointer ensures precision in all your woodworking projects.
- Cost Savings: Building your own jointer might be more cost-effective than purchasing a high-quality commercial model.
- Customization: You can customize your jointer to suit your specific needs and preferences.
- Learning Experience: Building a jointer provides an opportunity to learn and improve your woodworking skills.
- Project Control: You have complete control over the design and components of the jointer, leading to a tool that suits your workflow.
- Pride of Ownership: Building your own tools gives you a sense of accomplishment and ownership.
- Understanding Mechanics: Constructing a jointer deepens your understanding of its mechanics and functions.
- Satisfaction: Using a jointer you’ve built yourself adds a personal touch to your projects.
- Adaptability: You can modify or upgrade your jointer as your skills and needs evolve.
- Fine-Tuning: You can fine-tune your jointer’s adjustments to achieve the best results for specific projects.
- Sharpening Skills: Maintaining the blades on your jointer improves your blade-sharpening skills.
- Custom Jigs: You can create custom jigs and accessories to enhance the jointer’s capabilities.
- Skill Growth: The process of building a jointer hones your woodworking skills and problem-solving abilities.
- Community Engagement: Sharing your journey of building a jointer can engage you with the woodworking community.
- Unique Design: Your jointer can have a unique design and features that set it apart from commercial models.

While building a dual side benchtop jointer has numerous advantages, it’s essential to recognize that this project requires a high level of woodworking skill and safety awareness.
If you’re not experienced, seeking guidance from experienced woodworkers or professionals is recommended.
How to Make a Dual Side Benchtop Jointer 25 cons
While creating a dual side benchtop jointer can be a rewarding woodworking project, it’s important to consider the potential downsides and challenges. Here are 25 cons to be aware of:
- Complexity: Building a dual side jointer is a complex project that requires advanced woodworking skills and knowledge.
- Skill Requirement: This project isn’t suitable for beginners; it demands a high level of woodworking expertise.
- Safety Concerns: Working with power tools and complex mechanisms poses safety risks if not approached with caution.
- Time-Consuming: Building a jointer is time-consuming and might take longer than anticipated, especially if you’re new to the process.
- Precision Demands: Jointers require precise measurements and alignments; even small errors can affect performance.
- Expensive Tools: This project may require investment in expensive tools and equipment, impacting the overall cost.
- High Cost: While potentially cheaper than buying a commercial jointer, building your own can still be costly due to materials and tools.
- Trial and Error: You might encounter setbacks and need to troubleshoot issues, leading to trial-and-error situations.
- Noisy and Messy: Using power tools and cutting wood generates noise, dust, and debris that can be messy and disruptive.
- Risk of Inaccuracies: Inaccurate measurements or alignments can lead to a jointer that doesn’t function properly.
- Blade and Cutterhead Challenges: Properly aligning, sharpening, and maintaining the blades and cutterheads is a skill in itself.
- Lack of Expertise: If you lack experience, you might not notice errors until they become significant issues.
- Safety Equipment: Safety gear is essential but can be uncomfortable to wear for extended periods.
- Design and Engineering: Creating a jointer with proper mechanics and design requires engineering knowledge that not all woodworkers possess.
- Potential Frustration: The complexity of the project might lead to frustration and discourage less experienced woodworkers.
- Potential for Injury: Inadequate safety precautions can lead to serious injuries when working with power tools and machinery.
- Limited Resources: Comprehensive plans and guidance might be hard to find, especially for unique designs.
- Limited Warranty: Unlike commercial jointers, DIY versions don’t come with warranties or customer support.
- Maintenance Challenges: DIY jointers might require more frequent maintenance and adjustments due to their custom nature.
- Limited Resale Value: A DIY jointer might have limited resale value compared to a reputable commercial model.
- Space Considerations: A jointer requires space in your workshop, potentially limiting your available workspace.
- Skill Specialization: You might spend a lot of time on a project that doesn’t necessarily contribute directly to your woodworking goals.
- Design Limitations: Your DIY jointer might lack some features or precision found in professional models.
- Unpredictable Costs: Unexpected challenges can lead to additional expenses beyond your initial budget.
- Alternative Options: Commercial jointers offer reliability, precision, and safety, without the challenges of a DIY build.
Considering these cons, it’s important to honestly assess your skill level, resources, and the time you’re willing to invest before embarking on a project of this complexity.

If you’re new to woodworking or unsure about any aspect of the project, seeking advice from experienced woodworkers or professionals is recommended.
Start a Make a Dual Side Benchtop Jointer now
Creating a dual side benchtop jointer is an ambitious woodworking project that requires careful planning, precise execution, and a good understanding of woodworking techniques. If you’re ready to take on this challenge, here’s a step-by-step guide to get you started:
Step 1: Gather Materials and Tools
Before you begin, make sure you have all the necessary materials and tools on hand. You’ll need plywood or hardwood for the base and frame, aluminum or steel extrusions for the fence, cutterheads, bearings, bolts, screws, wood glue, safety gear, and a variety of woodworking tools including saws, drills, and measuring equipment.
Step 2: Design and Planning
Create detailed plans for your jointer, specifying dimensions, placements, and alignments. Decide on the size of the jointer based on your available workspace and the size of the boards you’ll be working with.
Step 3: Base and Frame
Cut the plywood or hardwood boards according to your plans to create the base and frame of the jointer. Assemble the base and frame using wood glue and screws, ensuring they are square and level.
Step 4: Fence Assembly
Attach the aluminum or steel extrusions to create the adjustable fence. Make sure the fence can be securely adjusted for depth of cut and locked in place. Ensure the fence is perpendicular to the bed.
Step 5: Cutterhead Assembly
Install bearings onto the cutterheads according to the manufacturer’s instructions. Attach the cutterheads to the frame, making sure they are parallel to each other and perpendicular to the bed.
Step 6: Motor and Power Transmission (Optional)
If you’re adding a motor, mount it securely and ensure it’s aligned with the cutterheads. Use pulleys and belts to transmit power from the motor to the cutterheads. Install a power switch and an emergency stop button.
Step 7: Safety Features
Install a blade guard to prevent accidental contact with the rotating cutterheads. Consider other safety features like a disconnect switch and proper grounding.
Step 8: Testing and Calibration
Power up the jointer and test it on scrap wood to ensure that all components are working correctly. Check the alignment of the cutterheads and make any necessary adjustments. Calibrate the fence and depth of cut for accurate results.
Step 9: Finishing Touches
Sand all wooden surfaces to ensure a smooth finish, and apply a protective coating to the wood. Label any moving parts or adjustments for easy reference.
Step 10: Safety Precautions
Always prioritize safety when using your jointer. Wear appropriate safety gear, including safety glasses and ear protection.
Keep the work area well-ventilated and follow proper safety practices while operating power tools.
Remember that building a dual side benchtop jointer is a complex project that requires woodworking skills, attention to detail, and a strong focus on safety.
If you’re new to woodworking or unfamiliar with certain aspects of the project, consider seeking guidance from experienced woodworkers or professionals.


