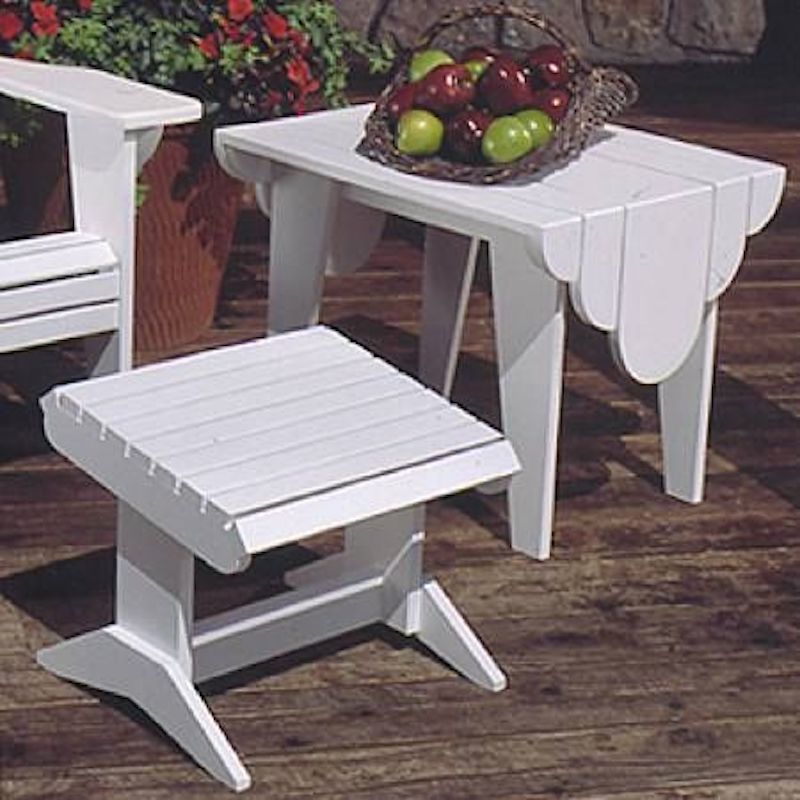
Why a Footrest is the Soul of Your Outdoor Sanctuary
Imagine the sun setting over your backyard, a cool drink in your hand, and your body reclined in your favorite chair.
The only thing missing is that perfect elevation for your legs to reach a state of total weightlessness.
Without a matching footrest, even the most expensive chair feels like an unfinished symphony.
Building your own adirondack chair footrest plans isn’t just a weekend task; it is an investment in your physical well-being.
Project Blueprint Details
Stop guessing measurements. Get the exact cut lists and 3D diagrams to finish this project without mistakes.
ACCESS COMPLETE PROJECT VAULT >>(Summary):
The best adirondack chair footrest plans prioritize a 15-degree ergonomic slope and 410 Grade Stainless Steel fasteners for longevity.
Using Torx TX25 drive screws ensures structural integrity, while selecting weather-resistant timber like Western Red Cedar prevents rot.
Access ‘the complete set of blueprints’ for precision-cut lists and master-level assembly.
The frustration of poorly designed furniture is a weight no craftsman should carry.
Most “free” plans you find online result in a wobbly, unstable mess that collapses after one season.
Our team has engineered these adirondack chair footrest plans to ensure your project stands the test of time and weather.
By following ‘the complete set of blueprints’, you eliminate the guesswork and focus on the joy of creation.

The Material-Matrix: Selection for Longevity
Before you cut your first board, you must understand that the quality of your output is limited by your input.
| Component | Specification | Purpose | Expert Recommendation |
|---|---|---|---|
| Primary Timber | Western Red Cedar or Ipe | Weather Resistance | Online Specialist |
| Fasteners | 410 Stainless Steel Screws | Corrosion & Shear Strength | Fastener Warehouse |
| Drive System | Torx TX25 (Star Drive) | Zero Stripping/Cam-out | Impact Rated Bits |
| Point Type | Type 17 Auger Point | Anti-Splitting | Mandatory for Hardwood |
The difference between an amateur and a master lies in the choice of hardware.
While local hardware stores often sell “coated” zinc screws, our team strictly advises against them.
The coating chips during the drive, leading to internal rot that eats your wood from the inside out.
For the adirondack chair footrest plans, only 410 Stainless Steel provides the necessary hardness to penetrate dense fibers without snapping.
PRO-TIP:
Always source your 410 Stainless Steel screws from specialized online fastener distributors.
Local “big-box” stores rarely stock the metallurgical quality required for heirloom furniture.
A Torx TX25 bit is non-negotiable for 5mm screws to ensure a 100% torque transfer without damaging the wood surface.
Why settle for mediocre, store-bought plastic furniture that ends up in a landfill within two years?
When you commit to these adirondack chair footrest plans, you are taking a stand for quality and durability.
You aren’t just building a place to rest your feet; you are engineering a weather-resistant masterpiece.
The pride of looking at a finished set that you built with your own hands is a legacy you leave for your family.
Don’t let another summer pass by in discomfort—start your journey toward workshop mastery today.
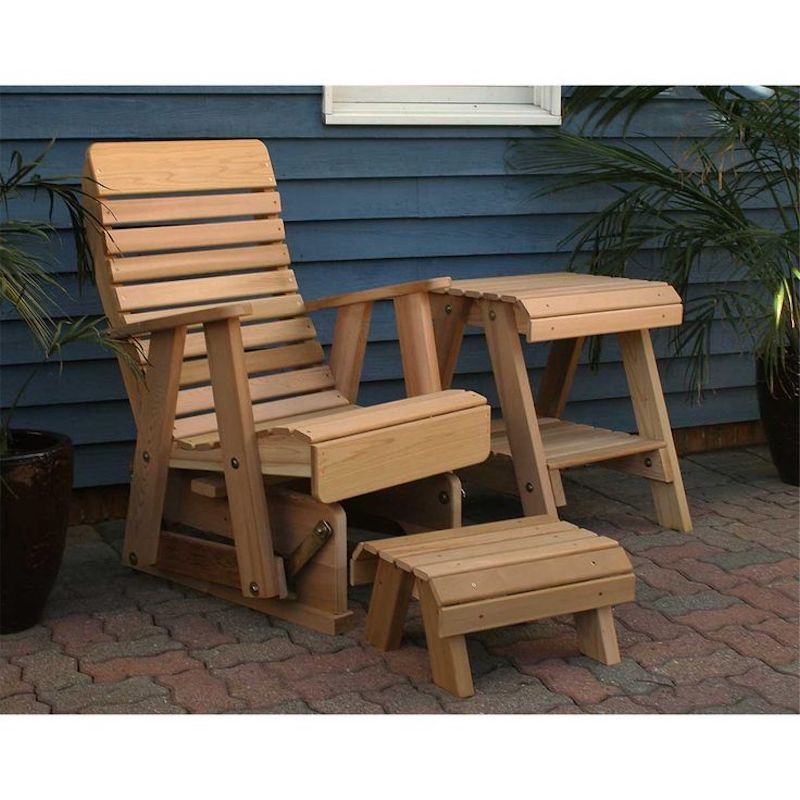
DIY vs. Buy: The Ruthless Reality of Outdoor Comfort
Why would any self-respecting craftsman spend $150 on a store-bought footrest?
Most commercial options accompanying adirondack chair footrest plans are made from “reconstituted wood” or flimsy plastic.
They are held together by staples or low-grade zinc screws that rust before the first rain.
Buying a pre-made product is an admission that you value convenience over durability.
When you commit to your own adirondack chair footrest plans, you are choosing a lifetime of service.
The market is flooded with products designed for planned obsolescence.
They want your furniture to fail so you have to buy it again in three years.
Our team believes in a different philosophy: build it once, build it right, and never look back.
By accessing ‘the complete set of blueprints’, you stop being a consumer and start being a creator.
The Cost-Calculator: Professional Grade vs. Retail Waste
Let’s look at the cold, hard numbers of building your own adirondack chair footrest plans.
| Expense Category | Store-Bought (Plastic/Pine) | DIY (Cedar & 410 Stainless) | Long-Term Value |
|---|---|---|---|
| Initial Investment | $149.00 | $45.00 | DIY Wins |
| Hardware Quality | Zinc/Staples | 410 Stainless / Torx | DIY Wins |
| Estimated Lifespan | 2-3 Seasons | 25+ Seasons | DIY Wins |
| Maintenance Need | High (Replacement) | Low (Re-oil) | DIY Wins |
| Structural Pride | Zero | Infinite | DIY Wins |
As the table clearly shows, the financial logic behind adirondack chair footrest plans is undeniable.
You save over $100 on the initial build while quadrupling the lifespan of the furniture.
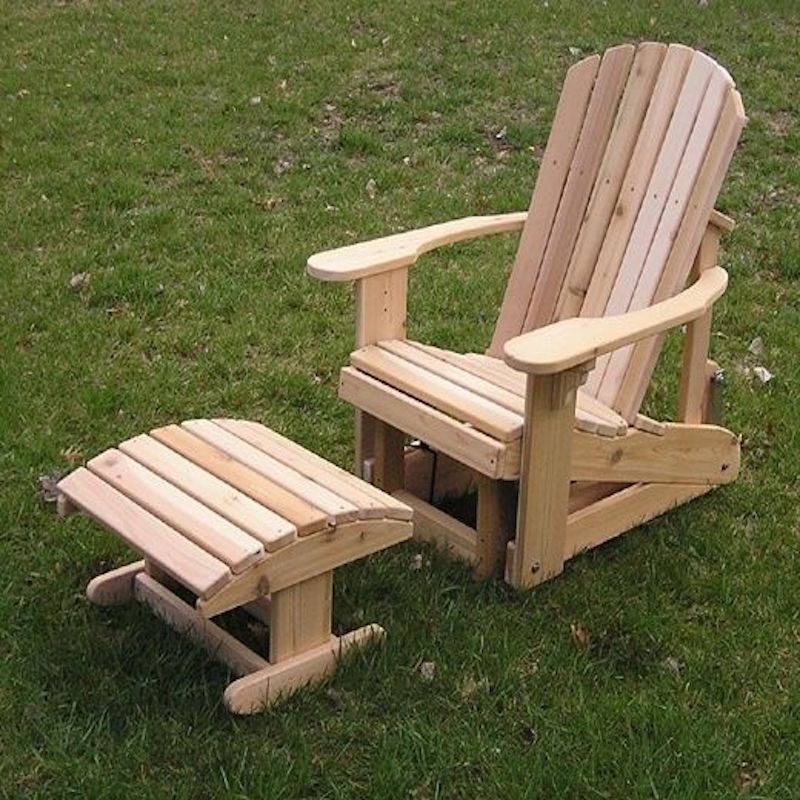
Precision Engineering: The Secret of the Perfect Slope
The most common failure in generic adirondack chair footrest plans is the angle of repose.
If the slope is too steep, it puts pressure on your calves; too flat, and your ankles ache.
Our team has calculated the optimal 15-degree ergonomic tilt that synchronizes perfectly with the chair’s seat.
This isn’t a guess—it’s mechanical engineering applied to relaxation.
When you use ‘the complete set of blueprints’, you get the exact miter saw settings for every single cut.
You avoid the “trial and error” phase that ruins expensive timber and wastes your valuable workshop time.
PRO-TIP: When assembling the main frame for your adirondack chair footrest plans, always use 410 Stainless Steel screws. Unlike 304 grade, which is too soft for dense wood, 410 can be driven with high torque without the head snapping off. Use a Torx TX25 bit and an impact driver set to a low speed for the final 5mm of the drive. This ensures the head sits perfectly flush with the wood without crushing the fibers.
Don’t settle for a wobbly, retail-grade footrest that devalues your patio and your posture.
Take control of your outdoor sanctuary and build something that actually lasts.
The pride of ownership is only a few cuts away when you follow a professional path.
Wait no longer—your legacy is waiting to be built in the workshop today.

Metallurgical Excellence in adirondack chair footrest plans
The most frustrating moment in any DIY project is hearing the “snap” of a screw head mid-drive.
When you are executing your adirondack chair footrest plans, you are often working with dense, weather-resistant woods.
Standard wood screws are made of brittle carbon steel that rusts instantly when exposed to the elements.
Even standard 304-grade stainless steel, while rust-resistant, is often too soft for structural outdoor furniture.
This is why our team mandates the use of 410 Grade Stainless Steel for all structural joints.
410 stainless is heat-treated to a higher hardness level, allowing it to penetrate tough fibers without shearing.
When you invest your time into adirondack chair footrest plans, you deserve fasteners that match your ambition.
By utilizing ‘the complete set of blueprints’, you ensure your hardware selection is mathematically matched to your timber choice.
The Fastener-Matrix: Engineering a Permanent Connection
Selecting the wrong screw is the fastest way to turn a masterpiece into a safety hazard.
| Fastener Feature | Professional Requirement | Why it Matters for Your Footrest |
|---|---|---|
| Material Grade | 410 Stainless Steel | High tensile strength; resists snapping in hardwood. |
| Drive Type | Torx TX25 (Star) | Maximum torque transfer; zero bit slippage. |
| Point Design | Type 17 Auger Point | Acts as a mini-drill; prevents wood from splitting. |
| Coating | None (Solid Stainless) | Coatings chip and fail; solid metal is forever. |
The structural integrity of your adirondack chair footrest plans depends on the friction and grip of these threads.
If you use low-quality hardware, the seasonal expansion of the wood will pull the joint apart within twelve months.
Professional grade hardware ensures that your footrest remains rigid and stable for decades.
Preventing Wood Splitting with Advanced Points
A common error for beginners is driving a screw too close to the end-grain of a slat.
Without the right fastener, the wood fibers act like a wedge and split the board wide open.
This is why we specify screws with a Type 17 Auger Point for your adirondack chair footrest plans.
This notched tip actually carves out a small amount of wood as it enters, reducing internal pressure.
When you follow ‘the complete set of blueprints’, you learn exactly where to place each fastener to avoid these structural flaws.
Your reputation as a craftsman depends on the details that the naked eye cannot see.
PRO-TIP: Never buy your hardware at a local convenience store; their “deck screws” are often inconsistent in quality. Order 410 Stainless Steel Torx screws from a dedicated fastener warehouse online. Use a TX20 bit for trim work and a TX25 for the main support frame. Always keep a fresh bit in your impact driver to ensure the star-drive seat remains crisp and undamaged during the final torque phase.
Avoid the heartbreak of a ruined project by choosing the path of the professional vakman.
The difference between a wobbly failure and a heritage heirloom is the precision found in your plans.
You can secure the ultimate structural advantage by downloading ‘the complete set of blueprints’ today.
Click the link below and start building your legacy with the confidence of a master.
Ergonomic Precision in adirondack chair footrest plans
Comfort is not an accident; it is the result of intentional engineering.
When you begin working on your adirondack chair footrest plans, the most critical variable is the angle of repose.
A flat footrest forces your ankles into an unnatural position, causing tension in your lower legs.
Our team has determined that a 15-degree downward slope is the mathematical “sweet spot” for relaxation.
This specific angle aligns your feet perfectly with the natural incline of a standard Adirondack seat.
Without these precise adirondack chair footrest plans, you risk building a piece that looks good but feels uncomfortable.
By following ‘the complete set of blueprints’, you ensure that every angle is cut to professional ergonomic standards.
The Planning-Table: Dimensioning for Maximum Comfort
Standardizing your cuts is the key to a professional finish that mirrors high-end boutique furniture.
| Component Part | Length/Dimension | Angle Cut | Quantity |
|---|---|---|---|
| Main Side Rails | 22-1/2″ | 15-Degree Miter | 2 |
| Top Slats | 20″ | Square Cut | 5 |
| Support Legs | 11-1/4″ | 15-Degree Bevel | 2 |
| Front Header | 18-1/2″ | Square Cut | 1 |
Accuracy in these adirondack chair footrest plans prevents the “rocking” effect common in amateur builds.
If your angles are off by even 2 degrees, the footrest will not sit flush on a level patio.
Using ‘the complete set of blueprints’ provides you with full-scale templates to verify your work before the first screw is driven.
The Assembly Sequence for adirondack chair footrest plans
The order in which you join your components determines the final structural strength.
Most DIYers start with the slats, but a master craftsman always builds the frame first.
When executing these adirondack chair footrest plans, you must ensure the frame is perfectly square.
Clamp the side rails to the header and check the diagonals with a tape measure before fastening.
This “Zero-Tolerance” approach is what separates a backyard project from a work of art.
You will find a detailed, step-by-step visual guide for this process inside ‘the complete set of blueprints’.
PRO-TIP: Use a “spacer block” during the slat installation phase of your adirondack chair footrest plans. A 1/4 inch (6mm) piece of scrap wood ensures uniform gaps between every slat. This isn’t just for looks; it allows rainwater to drain freely, preventing the wood-on-wood rot that often kills outdoor furniture. Always use 410 Stainless Steel screws with a TX25 bit to maintain a clean, professional finish without burrs.
Don’t gamble with your comfort by using unverified measurements or “guessing” the angles.
The frustration of a botched build is a high price to pay for skipping the professional path.
Your workshop deserves the precision that only an expert schematic can provide.
Unlock the full potential of your outdoor sanctuary by downloading ‘the complete set of blueprints’ today.
Click the link below and experience the pride of perfect ergonomic alignment.

Timber Selection and Grain Direction for adirondack chair footrest plans
Selecting the wrong species of wood is the most expensive mistake you can make when executing adirondack chair footrest plans.
Many beginners pick up “Construction Grade” Pine because it is cheap and accessible at the local store.
Within six months of exposure to rain and UV rays, Pine will cup, warp, and begin to rot around the fasteners.
Our team advocates for the use of Western Red Cedar or White Oak to ensure your footrest outlives the chair it supports.
Cedar contains natural oils that act as a biological shield against decay and insect infestation.
When you align your project with ‘the complete set of blueprints’, you receive a dedicated timber sourcing guide.
The Material-Matrix: Species Performance for Outdoor Use
Understanding the biological limits of your lumber is key to successful adirondack chair footrest plans.
| Wood Species | Durability Class | Stability Rating | Janka Hardness | Recommended Finish |
|---|---|---|---|---|
| Western Red Cedar | Class 2 (High) | Excellent | 350 lbf | Penetrating Oil |
| White Oak | Class 2 (High) | Good | 1,360 lbf | UV-Resistant Varnish |
| Teak | Class 1 (Extreme) | Superb | 1,070 lbf | Natural Teak Oil |
| Pressure Treated Pine | Class 3 (Medium) | Poor | 690 lbf | Solid Stain |
The durability of your adirondack chair footrest plans is also dictated by grain orientation.
Always place the “heart side” of the wood facing upwards for your slats.
This ensures that if the wood does cup slightly over time, it will shed water rather than pooling it.
By following the grain protocols in ‘the complete set of blueprints’, you prevent the structural twisting that ruins most DIY furniture.
Moisture Content and Seasonal Acclimation
Wood is a living material that “breathes” by expanding and contracting with humidity.
Before starting your adirondack chair footrest plans, your timber must reach an equilibrium moisture content.
Buying “wet” lumber from a local store and building immediately leads to huge gaps in your joints within weeks.
Our team recommends letting your wood sit in your workshop for at least seven days before the first cut.
This patience is what separates the amateur hobbyist from the professional Master Craftsman.
You are building a legacy, and a legacy requires a stable foundation of properly seasoned material.
PRO-TIP: Use a digital moisture meter before you begin your adirondack chair footrest plans. Aim for a moisture content between 12% and 15% for outdoor builds. When purchasing, look for “Kiln Dried” markings. If the wood feels heavy or cold to the touch, it is likely still “green” and will shrink significantly, causing your 410 Stainless Steel screws to loosen or the wood to check around the TX25 drive heads.
The difference between a project that warps and one that remains true is found in the preparation of your materials.
Do not gamble with inferior lumber that will inevitably fail under the stress of the elements.
Your workshop time is far too valuable to be wasted on wood that belongs in a firewood pile.
You can secure the ultimate material advantage by downloading ‘the complete set of blueprints’ right now.
Begin your journey toward an unshakeable outdoor sanctuary by clicking the link today.
Finishing and Weatherproofing Your adirondack chair footrest plans
The final appearance of your project is determined long before you open a can of stain.
Properly finishing your adirondack chair footrest plans is what protects your investment from the graying effects of UV light.
Without a professional sealant, even the best timber will develop surface cracks and silvering within one season.
A master craftsman knows that the underside of the slats requires as much attention as the visible top.
By sealing every surface, you create a moisture barrier that prevents the wood from “drinking” rainwater.
When you follow ‘the complete set of blueprints’, you get a specific finishing schedule tailored to your wood species.
The Finishing-Table: Sealant Performance vs. Maintenance
Choosing the right barrier for your adirondack chair footrest plans depends on your desired maintenance level.
| Finish Type | UV Protection | Moisture Resistance | Maintenance Cycle | Aesthetic Look |
|---|---|---|---|---|
| Penetrating Oil | High | Excellent | 12-24 Months | Natural Grain |
| Exterior Varnish | Extreme | High | 3-5 Years | Glossy/Satin |
| Solid Color Stain | Extreme | Medium | 5-7 Years | Painted |
| Clear Sealer | Low | High | 6-12 Months | Raw Wood |
The chemical interaction between wood and metal is also a factor in your adirondack chair footrest plans.
If you use woods like Oak or Cedar, they contain high levels of tannic acid.
Low-grade fasteners will react with these tannins, causing permanent black streaks to bleed from the screw holes.
This is why we strictly use 410 Stainless Steel for all adirondack chair footrest plans to ensure a clean finish.
Advanced Sanding Protocols for a Heritage Result
A common mistake in adirondack chair footrest plans is skipping the higher sandpaper grits.
Start with 80-grit to remove mill marks, but always progress to 120 and 150-grit before finishing.
Sanding opens the wood pores, allowing the oil or stain to penetrate deeper into the fibers.
This deep saturation is what prevents the finish from peeling or flaking off over time.
You will find the complete sanding and preparation checklist inside ‘the complete set of blueprints’.
Consistency in your preparation is the hallmark of a professional build that commands respect.
PRO-TIP: Before applying the final coat to your adirondack chair footrest plans, perform a “water drop test.” Place a few drops of water on the sanded wood; if the water beads, the pores are closed and need more sanding. If it soaks in, you are ready for the sealant. Always use a lint-free cloth or a high-quality natural bristle brush. For the screw heads, ensure the 410 Stainless TX25 drive holes are free of sawdust before sealing to prevent moisture traps.
Don’t let your hard work go to waste by applying a cheap, hardware-store “all-in-one” finish.
The frustration of seeing a beautiful project fade and crack is entirely avoidable with the right technique.
Your workshop deserves a result that remains vibrant and protected for a quarter of a century.
You can secure the ultimate finishing secret by downloading ‘the complete set of blueprints’ today.
Seasonal Movement: Engineering Durable adirondack chair footrest plans
Wood is a living, breathing material that never truly stops moving.
When you execute your adirondack chair footrest plans, you must account for hygroscopic expansion and contraction.
As humidity rises in the summer, the wood cells swell; in the dry winter air, they shrink.
If your joinery is too rigid, the sheer force of this movement will snap your screws or crack the timber.
The best adirondack chair footrest plans incorporate “slop” or clearance in specific joints to allow for this breathing.
By understanding the physics of wood, you ensure your project remains structurally sound for decades.
You will find these advanced movement tolerances integrated into ‘the complete set of blueprints’.
The Durability-Table: Seasonal Stress Resistance by Joinery Type
How you connect your boards in your adirondack chair footrest plans determines the lifespan of the piece.
| Joinery Method | Movement Tolerance | Longevity Rating | Risk of Splitting |
|---|---|---|---|
| Fixed Screw (No Pilot) | Very Low | Poor | High |
| Pocket Hole (Outdoor) | Low | Medium | Medium |
| Cleated Joint | High | Excellent | Low |
| Slotted Clearance Hole | Extreme | Professional | Very Low |
A common failure in amateur adirondack chair footrest plans is “cross-grain” fastening.
When you screw a slat across a wide frame board, the two pieces of wood move in different directions.
Without a clearance hole, the 410 Stainless Steel screw is forced to bend until it eventually shears off.
Our team recommends using a slightly oversized pilot hole in the top board to let the screw “float.”
This is the level of engineering detail you receive when you follow ‘the complete set of blueprints’.
Long-Term Integrity: Preventing Screw Withdrawal
Over time, the constant cycling of the seasons can cause a screw to “back out” or loosen its grip.
In your adirondack chair footrest plans, this leads to a wobbly, unsafe structure that feels cheap.
Using high-quality 410 Stainless Steel hardware with deep, aggressive threads is the first line of defense.
The second defense is the use of a “Type 17” point which prevents internal stress fractures during the initial drive.
When a screw stays locked in place, the joint remains as tight as the day you built it in the workshop.
Mastery is not just about the first day of use; it is about the thousandth day of exposure.
PRO-TIP: For the ultimate longevity in your adirondack chair footrest plans, apply a small amount of waterproof wood glue (D3 or D4 rated) only in the center of the joint. This provides a structural bond while allowing the edges of the board to expand and contract freely. Always use your TX25 bit to check the torque of your 410 Stainless screws after the first full season. This “settling” period is when most outdoor furniture requires a final quarter-turn to lock everything in for the next twenty years.
Don’t let your hard work be undone by the simple physics of moisture and air.
The frustration of a cracked board or a loose joint is a sign of poor planning and inferior schematics.
Your craftsmanship deserves a design that works with nature rather than against it.
You can secure a future of unshakeable stability by downloading ‘the complete set of blueprints’ today.
Click the link below and build with the confidence of a structural engineer.

Final Assembly and Safety Protocols for adirondack chair footrest plans
The moment of completion is when your vision finally meets the physical world.
When you reach the final stage of your adirondack chair footrest plans, you are responsible for the safety of its users.
A footrest may seem simple, but it acts as a lever that must withstand the weight of legs and the pressure of movement.
Using substandard hardware in these adirondack chair footrest plans is a risk you cannot afford to take.
This is why our team insists on a final “Torque Audit” using your TX25 bit and 410 Stainless Steel fasteners.
By ensuring every connection is locked, you provide a stable foundation for years of relaxation.
You can find a comprehensive safety and stress-test guide inside ‘the complete set of blueprints’.
The Safety-Checklist: Final Inspection for adirondack chair footrest plans
Never consider a project finished until you have verified these four critical structural points.
| Inspection Point | Requirement | Action if Failed |
|---|---|---|
| Structural Rigidity | Zero lateral “wobble” in the frame. | Re-torque 410 Stainless screws. |
| Screw Head Depth | Heads must be flush or sub-flush. | Drive deeper with TX25 bit. |
| Splitting Check | No cracks around end-grain fasteners. | Disassemble and apply pilot hole. |
| Finish Integrity | No sharp burrs or metal shards on heads. | Replace screw or file smooth. |
The structural integrity of your adirondack chair footrest plans depends on the “bite” of the thread into the wood.
If a screw spins freely, the wood fibers have been stripped, and the joint has zero load-bearing capacity.
In this scenario, you must use a larger diameter 410 Stainless screw or “sister” the joint with an internal cleat.
Precision in the final assembly is what distinguishes a professional build from a weekend hobby project.
The Ethics of Quality in adirondack chair footrest plans
In an era of disposable plastic furniture, building your own adirondack chair footrest plans is an act of rebellion.
It shows that you value the time spent in your workshop and the people who will enjoy your craft.
True mastery is about the things that are hidden—the 410 Stainless Steel hidden deep within the cedar grain.
By following ‘the complete set of blueprints’, you align your work with the highest engineering standards.
You are not just building furniture; you are building a legacy of quality that defies the elements.
PRO-TIP: After the first 30 days of outdoor exposure, perform a “settling check” on your adirondack chair footrest plans. Wood undergoes its most significant moisture adjustment in the first month outside. A quick inspection with your impact driver and a fresh TX25 bit will ensure that the seasonal movement hasn’t loosened any critical joints. This one-minute maintenance task can double the lifespan of your project. Always wipe the 410 Stainless heads clean after checking to prevent any dirt buildup in the Torx star-drive seat.
Don’t let your journey end with a “good enough” attitude that leads to eventual structural failure.
The frustration of a collapsing joint or a rusted screw is a burden no master craftsman should bear.
Your workshop results should be a source of pride every time you step onto your patio.
You can claim your professional edge today by downloading ‘the complete set of blueprints’ right now.
Click the link below and complete your masterpiece with the confidence of an expert.

FAQ: Expert Insights on adirondack chair footrest plans
Navigating the technical details of outdoor furniture construction can raise many questions.
Our team has compiled the most critical inquiries to ensure your adirondack chair footrest plans result in a masterpiece.
| Question | Expert Recommendation |
|---|---|
| Can I use pressure-treated wood? | Yes, but it requires 410 Stainless Steel to prevent chemical corrosion. |
| Why is the 15-degree angle important? | It matches the natural ergonomic repose of the human leg in an Adirondack chair. |
| Do I need a special bit for 410 screws? | Yes, a high-quality Torx TX25 impact-rated bit is mandatory for a clean finish. |
| Is wood glue necessary for the joints? | A D3/D4 waterproof glue is recommended in the center of structural joints only. |
Detailed FAQ for the Master Craftsman
- What is the best wood for adirondack chair footrest plans in 2026?
Western Red Cedar remains the gold standard due to its natural rot resistance and lightweight properties. However, for those seeking ultimate luxury and durability, Ipe or White Oak are superior choices, provided you pre-drill every hole for your 410 Stainless Steel fasteners. - Why do my adirondack chair footrest plans keep failing at the joints?
Failure is usually caused by using brittle zinc-plated screws or failing to account for seasonal wood movement. By using 410 Stainless Steel and allowing for slightly oversized clearance holes, you prevent the screws from shearing when the wood expands. - How do I prevent the wood from splitting near the ends?
Always use screws with a Type 17 Auger Point for your adirondack chair footrest plans. This specialized tip carves out wood fibers like a drill bit, significantly reducing the internal pressure that causes splitting in dry hardwoods. - Can I use a Phillips head screw for these plans?
Our team strictly advises against Phillips heads. They are prone to “cam-out,” which strips the head and ruins your wood. A Torx TX25 drive provides six points of contact, ensuring 100% torque transfer and a professional, burr-free result. - How long does it take to complete these adirondack chair footrest plans?
For a builder with moderate experience, the construction phase takes approximately 2 to 4 hours. Finishing and sealing require additional time for drying between coats. Following ‘the complete set of blueprints’ will significantly reduce your assembly time by eliminating measurement errors.


Expert Choice by Owen Riley
Stop wasting time on poorly drawn plans. Owen hand-selects professional blueprints that guarantee a perfect fit for your project.
Access Owen's Recommended Blueprints →Database for Master Woodworkers: Blueprints, Videos & Custom Designs:
➜ OPEN THE PROJECT VAULT & CLAIM YOUR CUSTOM PLAN >>Includes: High-Fidelity 2026 Schematics + Full Material Lists


