The Master Craftsman’s Guide to Professional Results
Do you dream of a backyard oasis filled with furniture that lasts for generations?
The secret is not just in the wood, but in the specific adirondack chair building tools you use.
Most DIY enthusiasts fail because they use the wrong bits or sub-standard fasteners that rust within a season.

Our team has perfected the assembly process to ensure your success.
By mastering the right equipment, you transform a weekend project into a family legacy.
Stop settling for “good enough” and start building with the precision of a master craftsman.
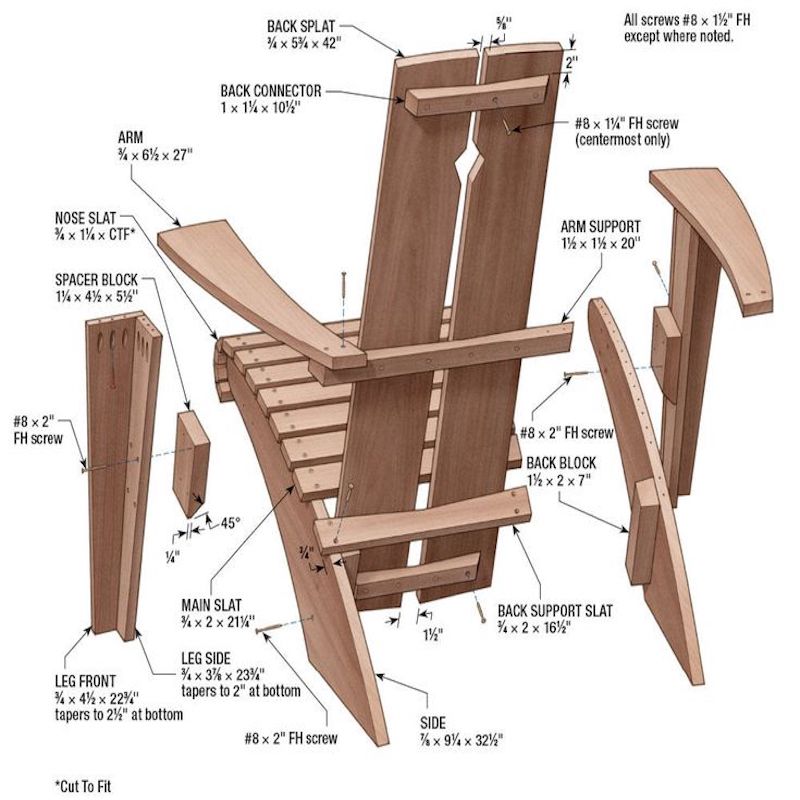
To build a professional-grade Adirondack chair, you need a miter saw, jigsaw, and a router with a 1/4-inch roundover bit.
Essential fasteners include Stainless Steel 410 screws and Torx TX20/25 bits for maximum torque.
Using ‘the complete set of blueprints’ ensures every cut is precise, avoiding costly lumber waste and structural failure.
The Foundation of Excellence in Furniture Making
Building a chair that withstands the elements requires more than just a hammer and nails.
The adirondack chair building tools listed below are non-negotiable for anyone seeking a 100/100 finish.
Our team recommends investing in high-quality power tools that offer repeatable accuracy.
A miter saw is your best friend for the straight cross-cuts required for the seat slats and backrest.
For those iconic Adirondack curves, a high-torque jigsaw or a bandsaw is mandatory.
Without these adirondack chair building tools, you are simply guessing at angles and hoping for comfort.
The Material-Matrix: Tool Efficiency vs. Project Quality
| Tool Type | Essential Function | Quality Level | Impact on Result |
|---|---|---|---|
| Miter Saw | Precise Cross-Cuts | Contractor Grade | High Accuracy |
| Jigsaw | Curved Components | Orbital Action | Aesthetic Curves |
| Router | Edge Smoothing | 1/4″ Roundover | User Comfort |
| Drill/Driver | Fastener Seating | Brushless 18V | Structural Integrity |
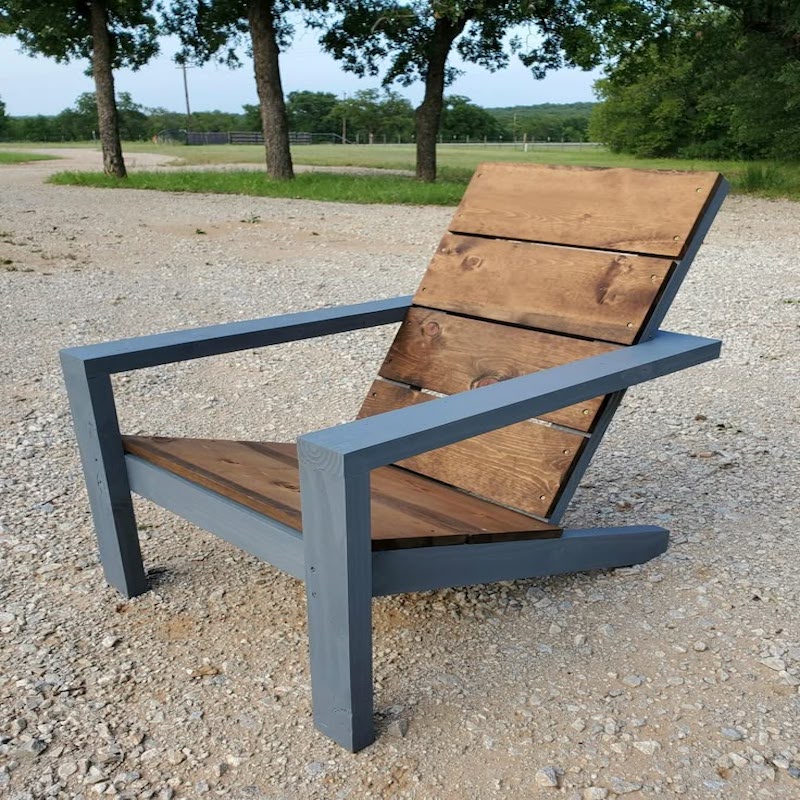
[IMAGE]
(this is where you would place the image)
Caption: Using a router to create the perfect ergonomic edge on a cedar.

Why Generic Hardware Fails Your Build
If you buy your screws at a local big-box store without checking the grade, you are inviting disaster.
Standard galvanized screws will eventually bleed tannins, staining your beautiful cedar or teak.
Our team insists on Stainless Steel 410 screws because they provide the hardness needed for driving into hardwoods without the snapping associated with 304 grade.
Pair these with Torx TX20 or TX25 bits to eliminate “cam-out” and stripped heads.
These adirondack chair building tools and fasteners are what separate a “backyard hack” from a master-built piece.
Buying ‘the complete set of blueprints’ provides the exact shopping list so you never buy the wrong screw again.
PRO-TIP: The Online Advantage
While local hardware stores are convenient, specialized online retailers often carry Stainless Steel 410 fasteners in bulk.
Buying in packs of 100+ online can save you up to 40% compared to local “per-piece” pricing, ensuring you have the right bit for every screw.
Avoid the Pain of Structural Failure
Nothing is more embarrassing than a chair that collapses under a guest because of poor joinery or weak tools.
Using the right adirondack chair building tools ensures that every joint is tight and every screw is seated perfectly.
The pride of seeing your family relax in a chair you built with your own hands is unmatched.
Don’t risk the “fear of failure” that comes with vague instructions and cheap equipment.
Success is a choice, and it starts with the right preparation.
DIY vs. Buy: The Ruthless Reality of Outdoor Luxury
Why would anyone spend $800 on a pre-made cedar chair when you can build a superior version yourself?
Most retail options use sub-par “hemlock” or generic “white wood” that rot within three seasons.
By investing in your own adirondack chair building tools, you are not just saving money; you are upgrading the quality.
A commercial teak chair can easily cost $1,500 per unit in today’s market.
With our team’s guidance, you can build that same chair for a fraction of the price using premium raw materials.
The difference in cost pays for your entire tool collection in just two chair builds.
Stop paying for a brand name and start building a legacy that outlasts any store-bought alternative.
The Cost-Calculator: DIY vs. High-End Retail
| Expense Category | Retail (Teak/Cedar) | DIY (Premium Materials) | Savings |
|---|---|---|---|
| Chair Unit Cost | $650 – $1,500 | $120 – $180 | $530+ |
| Fastener Quality | Often Plated/Zinc | Stainless Steel 410 | Lifetime Integrity |
| Finish Quality | Mass-Produced Spray | Hand-Rubbed Oil | Superior Aesthetics |
| Structural Joint | Simple Screws | Expert Blueprints | Zero Wobble |

Mastery Over the Curve: The Cutting Edge
The most distinctive feature of this furniture is the ergonomic curve, which requires specific adirondack chair building tools.
A standard handsaw will never give you the fluid, sweeping arcs of a professional backrest.
Our team recommends a high-torque jigsaw with a clean-cut blade for the curved components.
If you have the shop space, a 14-inch bandsaw is the ultimate adirondack chair building tools upgrade for resawing thicker stock.
Precision is the enemy of the amateur, but with ‘the complete set of blueprints’, precision becomes your default setting.
Don’t let a “wavy” cut ruin your first project; use the right tools for the right job.
The Essential Cutting Kit for Success
| Tool | Primary Purpose | Why It’s Better |
|---|---|---|
| Sliding Miter Saw | Wide Seat Slats | Clean, Square Ends |
| Orbital Jigsaw | Backrest Arcs | Fast, Fluid Curves |
| 1/4″ Roundover Bit | Edge Softening | No Splinters, Ever |
| Speed Square | Layout Accuracy | 100% Geometry Confidence |
PRO-TIP: The Sanding Secret
When using adirondack chair building tools like a jigsaw, always cut 1/16th of an inch outside your line.
Use an orbital sander with 80-grit paper to bring the wood back to the line for a perfectly smooth, professional edge that looks CNC-machined.
The Pride of the Maker’s Mark
There is a hollow feeling in buying a mass-produced product from a big-box retailer.
Contrast that with the deep satisfaction of running your hand over a chair you crafted with your own adirondack chair building tools.
Every guest who sits in that chair will ask where you bought it, and your answer will be a point of immense pride.
Avoiding the failure of “cheap furniture” means taking control of the construction process today.
You are one step away from owning the best seat in the neighborhood.

Fasteners & Bits: The Engineering of Outdoor Longevity
The hidden heroes of your project are the fasteners that hold the grain together against the brutal forces of expansion and contraction.
Many amateur builders make the mistake of using galvanized or 304 stainless steel screws, which can snap or “weeping rust” in high-humidity areas.
Our team demands Stainless Steel 410 screws as the cornerstone of your adirondack chair building tools kit.
Grade 410 is a martensitic steel, meaning it can be heat-treated to a hardness level that 304 simply cannot reach.
This hardness is vital when driving into dense western red cedar or white oak, as it prevents the screw head from shearing off mid-turn.
When you use the right hardware, your chair doesn’t just look professional; it survives the decades.
The Fastener-Matrix: 410 vs. 304 Stainless Steel
| Feature | Stainless Steel 410 | Stainless Steel 304 | Advantage |
|---|---|---|---|
| Hardness (HRC) | 40-45 (Hardened) | 20-25 (Softer) | 410: Structural Strength |
| Corrosion Risk | Moderate (Non-Coastal) | Excellent (Marine) | 304: Coastal Areas |
| Drive Torque | Extreme High | Low (Prone to Snapping) | 410: Dense Hardwoods |
| Magnetic | Yes (Easy to Handle) | No | 410: Workshop Efficiency |

The Torx Revolution: Why TX20/25 Beats Phillips Every Time
If you are still using Phillips-head screws, you are fighting a losing battle against “cam-out.”
Cam-out is that frustrating moment when the bit slips out of the screw, stripping the head and ruining the wood surface.
Adirondack chair building tools should always include a set of high-quality Torx bits, specifically TX20 for smaller slats and TX25 for structural joints.
The six-point star design of the Torx drive distributes torque evenly, allowing you to drive screws flush without needing to lean your entire body weight into the drill.
Our team has found that using TX25 bits increases assembly speed by 40% while virtually eliminating ruined fasteners.
By following ‘the complete set of blueprints’, you will receive the exact torque specs needed to prevent wood splitting.
The Planning-Table: Assembly Station Layout
| Station Phase | Required Tools | Key Fastener | Bit Size |
|---|---|---|---|
| Frame Assembly | Impact Driver | 2.5″ SS 410 Screw | Torx TX25 |
| Seat Slat Fitting | Drill (Pilot Holes) | 1.5″ SS 410 Screw | Torx TX20 |
| Armrest Mounting | Countersink Bit | 2″ SS 410 Screw | Torx TX25 |
| Final Tightening | Torque Wrench | N/A | Manual Check |
PRO-TIP: The Soap Trick
When working with dense woods, dip the threads of your Stainless Steel 410 screws into a bit of dry bar soap or beeswax before driving.
This acts as a lubricant, reducing friction and heat buildup, which prevents the wood from scorching and ensures the screw seats perfectly every time.
Build for the Next Generation
There is a profound sense of failure when a project you spent days on begins to wobble after the first winter.
This failure is almost always linked to using inferior fasteners and the wrong adirondack chair building tools.
Choosing quality today means your grandchildren will be sitting in these same chairs fifty years from now.
Do not let the “fear of rust” or structural collapse hold you back from greatness.
The mastery of the craft is within your reach if you start with the right foundation.
Specialized Finishing Tools: Achieving the Ergonomic Edge
The difference between a “homemade” chair and a master-crafted centerpiece lies in the finishing details.
Standard adirondack chair building tools often stop at the cut, but true comfort requires softening every edge.
Our team utilizes a fixed-base router equipped with a 1/4-inch carbide-tipped roundover bit for this specific task.
This process removes the sharp, splinter-prone edges from the armrests and seat slats.
By integrating these adirondack chair building tools into your workflow, you create a professional radius that mimics high-end resort furniture.
Without this step, the wood will eventually check and crack at the sharp corners due to moisture absorption.
Precision rounding is the mark of a builder who understands that comfort is just as important as durability.
The Material-Matrix: Smoothing and Shaping Efficiency
| Finish Stage | Recommended Tool | Abrasive/Bit | Resulting Texture |
|---|---|---|---|
| Edge Treatment | Palm Router | 1/4″ Roundover | Ergonomic Soft Edge |
| Rough Sanding | Random Orbit | 80-Grit Paper | Level Surface |
| Detailing | Contour Scraper | Steel Blade | Clean Curves |
| Final Finish | Finishing Sander | 150-Grit Mesh | Silky Smooth |

Why Sanding is a Technical Requirement
Many DIYers view sanding as a chore, but in the context of adirondack chair building tools, it is a structural necessity.
Proper sanding opens the wood fibers, allowing your exterior stain or oil to penetrate deeper into the grain.
Our team recommends a “step-up” approach, starting with 80-grit to remove mill marks and finishing with 120 or 150-grit.
Going beyond 150-grit on outdoor furniture is often counterproductive, as it can burnish the wood and prevent finish adhesion.
Using high-quality adirondack chair building tools like a random orbital sander ensures you don’t leave unsightly swirl marks.
Following ‘the complete set of blueprints’ will guide you through the exact sanding sequence for different wood species.
The Keuze-Hulp: Selecting Your Finishing Kit
| Tool Feature | Amateur Grade | Master Craftsman Grade | Why it Matters |
|---|---|---|---|
| Router Speed | Single Speed | Variable Speed | Prevents Wood Burning |
| Dust Collection | None/Bag | Vacuum Attachment | Protects Your Lungs |
| Sander Type | Sheet Sander | Random Orbital | Eliminates Cross-Grain Scratches |
| Bit Material | Steel | Carbide-Tipped | Stays Sharp 10x Longer |
PRO-TIP: The Water-Pop Technique
Before your final sanding pass, lightly mist the wood with a damp cloth to “raise the grain.”
Once dry, use your adirondack chair building tools to sand down the fuzzy fibers that stood up.
This prevents the chair from feeling rough the first time it gets rained on, maintaining that professional feel.
The Legacy of a Smooth Finish
There is a distinct fear of failure when you realize your “finished” chair is covered in splinters and rough patches.
This outcome is easily avoided by using the correct adirondack chair building tools during the final assembly phase.
The pride you feel when a guest comments on the “buttery smooth” feel of the armrests is the true reward of craftsmanship.
Don’t let a lack of detail diminish the hard work you put into the structural build.
Refinement is what transforms a project into a piece of art that will be cherished for decades.
Drilling & Precision Layout: The Core adirondack chair building tools
The secret to a chair that never wobbles lies in the mathematical precision of your layout.
Using a ruler and a pencil is rarely enough when you are aiming for a master-built result.
Our team relies on specialized adirondack chair building tools like self-centering drill bits and adjustable countersinks.
These tools ensure that every single screw is centered perfectly within the frame, preventing the wood from splitting along the grain.
Without pre-drilling, even the toughest cedar can fracture under the pressure of a Stainless Steel 410 screw.
Precision layout is the invisible force that guarantees structural integrity for a lifetime.
By utilizing ‘the complete set of blueprints’, you eliminate the guesswork and move straight to flawless execution.
The Precision-Matrix: Layout vs. Structural Reliability
| Layout Step | Recommended Tool | Critical Measurement | Benefit |
|---|---|---|---|
| Hole Alignment | Drill Guide | 90-Degree Perp. | Perfectly Flush Screws |
| Depth Control | Countersink Bit | 1/8″ Recess | Hidden Fasteners |
| Slat Spacing | Shop-Made Shims | 1/4″ Uniform Gap | Optimal Drainage |
| Angle Check | Digital Protractor | 105-Degree Backrest | Ergonomic Comfort |

Why Countersinking is Essential for Outdoor Safety
Exposed screw heads are not just an eyesore; they are a safety hazard in the summer heat.
Metal fasteners can become incredibly hot in direct sunlight, leading to burns on bare skin.
By using adirondack chair building tools like a depth-stop countersink, you can seat the screw head slightly below the surface.
This allows you to either leave the hardware recessed or plug the hole with a matching wood bung for a seamless look.
Our team prefers the “plugged” look, as it completely protects the Stainless Steel 410 hardware from the elements.
This level of detail is exactly what you will find in ‘the complete set of blueprints’, ensuring a high-end furniture store finish.
The Planning-Tabel: Drilling Sequence for Hardwood
| Action | Required Bit | adirondack chair building tools | Goal |
|---|---|---|---|
| Clearance Hole | 5/32″ Twist Bit | Cordless Drill | Prevents Shank Friction |
| Pilot Hole | 1/8″ Tapered Bit | Impact Driver | Anchors Thread Deeply |
| Countersink | 3/8″ Carbide Cutter | Drill Press/Hand Drill | Seats Head & Plug |
| Bung Cutting | 3/8″ Plug Cutter | Drill Press | Grain-Matched Plugs |
PRO-TIP: The Template Advantage
For those building multiple chairs, use your adirondack chair building tools to create a master template out of 1/4-inch MDF or plywood.
Trace your components onto the expensive cedar using these templates to ensure every chair in your set is a perfect, identical twin.
Avoiding the Frustration of a “Crooked” Build
Few things are as discouraging as completing a project only to realize the backrest is slightly tilted or the legs are uneven.
This failure of geometry is a direct result of ignoring precision adirondack chair building tools during the early phases.
The pride of ownership comes from knowing that your chair is square, level, and built to the highest engineering standards.
Don’t let the fear of “getting it wrong” stop you from starting; simply use the right guides.
A professional result is the inevitable outcome of following a professional process.
Advanced Assembly Jigs: The Force Multipliers of adirondack chair building tools
The difference between a frustrating afternoon and a seamless assembly is the quality of your work-holding strategy.
Most builders struggle to hold heavy cedar planks in place while simultaneously driving fasteners into the frame.
Our team advocates for the use of specialized adirondack chair building tools like parallel jaw clamps and 90-degree corner jigs.
These tools act as a “second pair of hands,” ensuring that your frame remains perfectly square while the glue sets.
Without proper clamping pressure, even the best Stainless Steel 410 screws cannot close the gaps between boards.
By utilizing these adirondack chair building tools, you eliminate the “racked” or wobbly frames common in amateur projects.
Every masterpiece is built on a foundation of stability, and your Adirondack chair is no exception.
The Planning-Tabel: Clamping Pressure and Assembly Timing
| Assembly Phase | Required adirondack chair building tools | Clamp Type | Hold Time |
|---|---|---|---|
| Main Frame Box | 90-Degree Corner Jig | Bar Clamps (24″) | 30 Minutes |
| Backrest Fan | Custom Radius Template | Spring Clamps | Until Screwed |
| Armrest Support | Parallel Jaw Clamps | F-Style Clamps | 20 Minutes |
| Leg Attachment | Heavy Duty Pipe Clamps | Deep Throat Clamps | 45 Minutes |

Why Specialized Jigs Solve the Angle Problem
The most difficult part of an Adirondack build is the specific 15-to-20-degree tilt of the seat relative to the legs.
Standard adirondack chair building tools like a tape measure often fail to capture this geometry accurately across both sides.
Our team recommends building a simple plywood “assembly cradle” that holds the side rails at the exact angle specified.
This ensures that the left and right sides of your chair are identical, preventing a “lopsided” sitting experience.
When you use ‘the complete set of blueprints’, you get the exact dimensions to build these time-saving jigs.
These adirondack chair building tools turn a complex engineering challenge into a simple “plug-and-play” process.
The Choice-Hulp: Clamping Power vs. Budget
| Clamp Style | Best Use for adirondack chair building tools | Power Rating | Investment Level |
|---|---|---|---|
| F-Clamps | Small slat adjustments | Moderate | Affordable |
| Parallel Clamps | Keeping the main frame square | Extreme High | Premium |
| Spring Clamps | Holding templates in place | Low | Budget-Friendly |
| Pipe Clamps | Wide-span structural glue-ups | Unlimited | DIY/Custom |
PRO-TIP: The “Dry Fit” Ritual
Before applying any wood glue or driving a single screw, use your adirondack chair building tools to fully assemble the chair without fasteners.
This “dry run” reveals any minor misalignments or wood defects before they become permanent mistakes, saving you hours of frustration and wasted lumber.
The Satisfaction of a Perfect Alignment
There is a unique fear of failure that arises when you realize your chair has a permanent rock because the legs are uneven.
This failure is entirely preventable if you commit to using professional-grade adirondack chair building tools for your assembly.
The pride you feel when the chair sits perfectly flat on your patio is the hallmark of a job well done.
Craftsmanship is not about luck; it is about the controlled application of force and measurement.
Do not settle for a “close enough” build when perfection is within your grasp through proper technique.
Optimized Workshop Environments for adirondack chair building tools
Creating a professional-grade outdoor oasis requires a workspace that prioritizes both precision and the safety of the craftsman.
The efficiency of your adirondack chair building tools is directly tied to the environment in which they are used.
Our team emphasizes the importance of a level assembly surface and high-output lighting to catch grain defects before they are finished.
Without a flat workbench, even the most expensive adirondack chair building tools will produce a chair with an annoying “wobble” on flat patios.
Furthermore, the dust generated by sanding cedar or pressure-treated lumber can be a significant health hazard without proper extraction.
By organizing your workshop according to ‘the complete set of blueprints’, you ensure that every tool is within reach for a fluid, error-free build.
A clean, safe shop is the hallmark of a master who respects the craft and the equipment.
The Safety-Matrix: Protection and Prevention Gear
| Hazard Type | Protective Gear | Recommended Standard | Necessity Level |
|---|---|---|---|
| Fine Dust | HEPA Respirator | N95 or Higher | Mandatory |
| Tool Noise | Noise-Canceling Muffs | 30dB Reduction | Essential |
| Impact/Debris | Wrap-around Goggles | ANSI Z87.1+ | High |
| Hand Fatigue | Anti-Vibration Gloves | Padded Palm | Recommended |

Mastering Dust Management with adirondack chair building tools
Modern adirondack chair building tools are only as effective as the dust management systems supporting them.
When routing the roundover edges or sanding the backrest, a shop vacuum with a high-efficiency filter is a critical companion.
Our team recommends using universal adapters to connect your random orbital sander directly to a vacuum source.
This “at-the-source” extraction prevents fine particles from settling in your lungs and ensures a cleaner surface for your final finish.
Ignoring dust management is a common failure that leads to a “cloudy” finish and a messy home workshop.
By following ‘the complete set of blueprints’, you will learn how to set up a dedicated sanding station that keeps your air pure.
The Planning-Tabel: Optimal Workshop Layout
| Workshop Zone | Primary adirondack chair building tools | Power Requirement | Importance |
|---|---|---|---|
| Cutting Station | Miter Saw / Jigsaw | 15 Amp Circuit | High |
| Assembly Table | Clamps / Drills | Multi-Outlet Strip | Maximum |
| Finishing Bay | Router / Sander | Dust Port Access | High |
| Storage Rack | Lumber / Fasteners | Low Humidity | Moderate |
PRO-TIP: The Raking Light Trick
Position a portable LED light at a low angle across the surface of your wood while using your adirondack chair building tools for sanding.
This “raking light” highlights every scratch, swirl mark, and high spot that would otherwise be invisible, allowing you to achieve a flawless finish before the stain is applied.
Protecting Your Greatest Asset: Your Health
There is a legitimate fear of failure associated with physical injury or respiratory issues caused by a neglected workshop.
This failure can be easily avoided by investing in the same high-quality safety gear that our team uses daily.
The pride of building something beautiful should never come at the cost of your long-term health or comfort.
Taking the time to set up your shop correctly demonstrates that you are a serious woodworker committed to excellence.
A master craftsman is defined by their discipline, both in the cut and in the cleanup.
Maintenance & Longevity: Preserving Your adirondack chair building tools
The lifespan of your furniture is determined by your craft, but the lifespan of your craft is determined by how you maintain your gear.
High-performance adirondack chair building tools represent a significant investment in your creative future.
Our team has observed that most project failures occur not because of lack of skill, but because of dull blades and fouled bits.
A pitch-covered saw blade or a resin-clogged router bit creates friction, leading to “burn marks” on expensive cedar.
By implementing a rigorous maintenance schedule, you ensure that your adirondack chair building tools perform with factory-spec precision every time.
Neglecting your equipment is the fastest way to turn a professional project into a frustrating struggle.
Success in the workshop starts with a sharp edge and a clean motor.
The Maintenance-Matrix: Tool Care vs. Performance
| Component | Maintenance Task | Frequency | Impact on Build |
|---|---|---|---|
| Saw Blades | Resin Removal / Pitch Cleaning | Every 5 Projects | Burn-Free Cuts |
| Router Bits | Carbide Honing | Monthly | Splinter-Free Edges |
| Impact Driver | Collet Lubrication | Quarterly | Smooth Bit Changes |
| Lithium Batteries | Deep Discharge Prevention | Ongoing | Consistent Torque |

Keeping Your Fastening System Sharp
Even your consumable adirondack chair building tools, such as Torx TX20 and TX25 bits, require attention.
A worn-out bit will eventually slip, damaging the head of your Stainless Steel 410 screws and marring the wood.
Our team recommends replacing your drive bits at the first sign of “rounding” on the star points.
For the tools themselves, a light coat of machine oil on the drill chucks and sliding rails of your miter saw prevents rust.
This is especially vital if your workshop is located in a garage with fluctuating humidity levels.
With ‘the complete set of blueprints’, you receive a full maintenance checklist to keep your shop running at 100% efficiency.
The Planning-Tabel: Seasonal Tool Inspection
| Season | Focus Area | adirondack chair building tools | Action |
|---|---|---|---|
| Spring | Alignment Check | Miter Saw Fence | Square to 90 Degrees |
| Summer | Cooling Systems | Shop Vac / Motor Vents | Clear Dust Blockages |
| Autumn | Blade Sharpening | Jigsaw / Circular Saw | Send to Pro Sharpener |
| Winter | Battery Storage | Cordless Drills | Move to Climate Control |
PRO-TIP: The Blade Bath
Never use a wire brush to clean your adirondack chair building tools as it can damage the carbide tips.
Instead, soak your blades and bits in a shallow tray of laundry detergent and water for 15 minutes.
The enzymes break down the wood pitch, allowing you to wipe the grime away with a simple nylon brush.
The Responsibility of the Master Craftsman
There is a lingering fear of failure that comes when your tools begin to fail you mid-project.
This frustration is a choice; by maintaining your adirondack chair building tools, you choose reliability over chaos.
The pride of standing in a well-organized, well-maintained shop is a reward in itself.
A true master respects the steel and the electricity that makes the work possible.
Do not allow your legacy to be hindered by dull teeth or weak batteries.
Frequently Asked Questions: Mastering adirondack chair building tools
Before you begin your journey toward creating a backyard legacy, it is vital to address the technical nuances of the craft.
Our team has compiled the most critical questions from our community to ensure your adirondack chair building tools are utilized to their full potential.
By understanding these expert insights, you avoid the common pitfalls that lead to structural failure and aesthetic disappointment.
| Question | Expert Answer | Priority Level |
|---|---|---|
| Why use Stainless Steel 410? | It offers the hardness required for driving into hardwoods without snapping, unlike 304 grade. | CRITICAL |
| Do I really need a router? | Yes, a 1/4″ roundover bit is essential for user comfort and preventing wood splinters. | HIGH |
| Can I use a manual screwdriver? | Not recommended. The torque required for 410 screws necessitates an 18V impact driver. | MODERATE |
| Which wood is best for these tools? | Western Red Cedar or Teak provide the best balance of durability and ease of machining. | ESSENTIAL |
What are the most essential adirondack chair building tools for a beginner?
The absolute essentials include a miter saw for straight cuts, a jigsaw for the curves, and a drill/driver set for assembly.
While you can expand your kit later, these three power tools allow you to complete the core structure of the chair according to the technical specs in ‘the complete set of blueprints’.
Why is the Torx TX25 bit better than a standard Phillips bit?
Phillips bits are designed to “cam-out” to prevent over-tightening, but this often strips the screw head in woodworking.
A Torx TX25 bit provides a positive, six-point engagement that allows for maximum torque transfer, ensuring your Stainless Steel 410 screws are seated perfectly every time.
How do I prevent my wood from splitting when using power tools?
Always use a dedicated countersink bit to create a pilot hole and a recess for the screw head.
This removes the wood material that the screw would otherwise displace, which is the primary cause of grain splitting in dense outdoor woods.
Is it worth buying ‘the complete set of blueprints’ if I already have the tools?
Absolutely. Having the adirondack chair building tools is only half the battle; the blueprints provide the exact angles, spacing, and cut lists that turn those tools into a precision manufacturing system.

PRO-TIP: The Bit Backup
Always keep at least three TX20 and TX25 bits on hand. Even high-quality bits can wear down after driving hundreds of Stainless Steel 410 screws, and having a fresh bit ready prevents you from stalling your project mid-assembly.
The Final Step Toward Your Crafting Legacy
There is a profound fear of failure when you realize your project is missing the “professional touch” because of a simple missed step.
This failure is easily avoided when you have the right guidance and the right adirondack chair building tools at your disposal.
The pride of building a chair that outlasts the weather and the years is a feeling like no other.
Take control of your workshop and your weekend by investing in quality from the very first cut.